
how to automate the management of custom partitions for power bi semantic models (former datasets).

introduction.
Let’s imagine you have a very large fact table that contains data with several years back. You have the requirement to load the table a couple of times per day, where new data is added, and old data is updated. Processing the entire table with every single refresh is likely not the best solution, especially since much (if not all) of the historic data didn’t change since the last load. What if we could ask Power BI to only update the data of the last twelve months? Or could we even tell Power BI exactly which part of the table to reload with every refresh? I am thinking about something like this: The large night batch processes the fact table’s last two years while all the refreshes during the day only reload the last six months. And on the weekend – when there is plenty of time and resources – the whole table is refreshed, so we are able to catch rare historic changes as well. Sounds something you want? Well, let me introduce you to the world of partitions!
The idea of partitions is to split the table into different parts. With every refresh you can then choose yourself which partition of the table you’d like to load. Actually, Power BIs built-in incremental refresh feature creates and manages partitions for you. While you have some customization capabilities with the incremental refresh policy, you are not entirely free in how to design each partition. For instance, incremental refresh only works on date columns. This is problematic, if you want to partition your table on a non-date column like business region. Another one is, if you already have a certain partition strategy implemented in your underlaying data layer. Mirroring the partitions of your mart tables with the tables in your semantic model can help orchestrating and optimising your ETL. Finally, as Patrick from guy in a cube points out, you might want to consider custom partitioning in order to refresh a table in parallel and thereby minimising processing time. As mentioned earlier, in such cases, Power BI’s built-in incremental refresh feature might not be the optimal solution due to its customization limitations. However, it does take care of merging and managing partitions for you – fully automated and completely under the hood! A big big goodie!
As so often, you either pick the out-of-the-box solution, or you go down the rockier road of building and managing it yourself. With the latter, there might be a treat down the path though: More freedom in designing your custom partitions according to your very own requirements. So, what might hold you back? Maybe an automated way of changing and managing the partitions like the one that Power BI provides? Well, we got you covered here! This blog post provides a solution for the automation of creating and managing custom partitions by utilizing Azure Function Apps, the TOM library and Power BI’s XMLA endpoints.
.
prerequisites.
1. A Power BI premium capacity or a PPU license. XMLA endpoints can only be used on premium workspaces
2. A semantic model published to a premium workspace. The semantic model shall contain a large table that is intended to be partitioned
3. Permissions to create and manage azure functions as well as the right to change settings in Power BI’s Admin portal
.
plan of action.
1. What is our starting point?
2. Create the Azure Function
3. Fix Power BI access and settings
4. Change name of default partition
5. Showtime!
.
1. What is our starting point?
Let’s quickly recap the prerequisites.
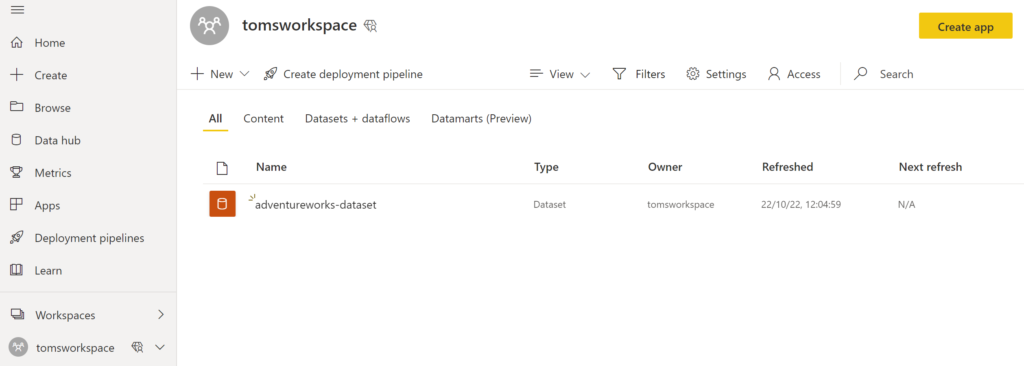
a. A premium workspace in Power BI with a semantic model:
.
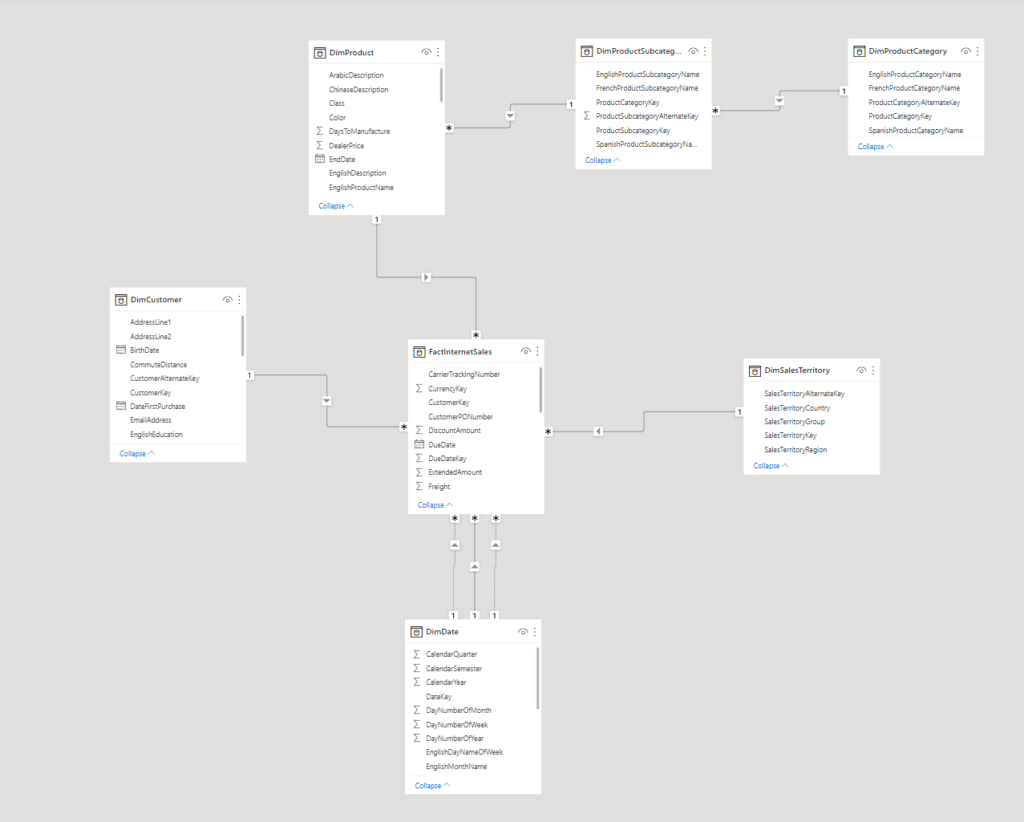
Our model looks like this:
.
We are using the large AdventureWorks sample in an Azure SQL Database. If you would like to find out how to add the real AdventureWorks sample (and not the lightweight version) to an Azure SQL database, make sure to check out this blog post. The table we would like to create partitions on is FactInternetSales. In this sample, the table has only about 60 000 rows which, admittedly, is not large enough to make partitioning worth in real life. In fact, one needs to be careful with the size of partitions, since Power BIs segments on the tables cannot be larger than the partitions in place. This means, overpartitioning can lead to poor query performance as Power BI might need more time to put the partial results of all the simultaneous segment scans back together in order to return the end result.
.
2. Create the Azure Function
Gosh! Azure Functions? Apps? .NET? C#? This sounds tough… Don’t you worry! It’s not that hard. You do not need to be able to write the code anyway. Just try to understand it so you know what’s happening.
We start by creating the resources. For this, go into Azure and browse for Azure Functions on the Marketplace:

.
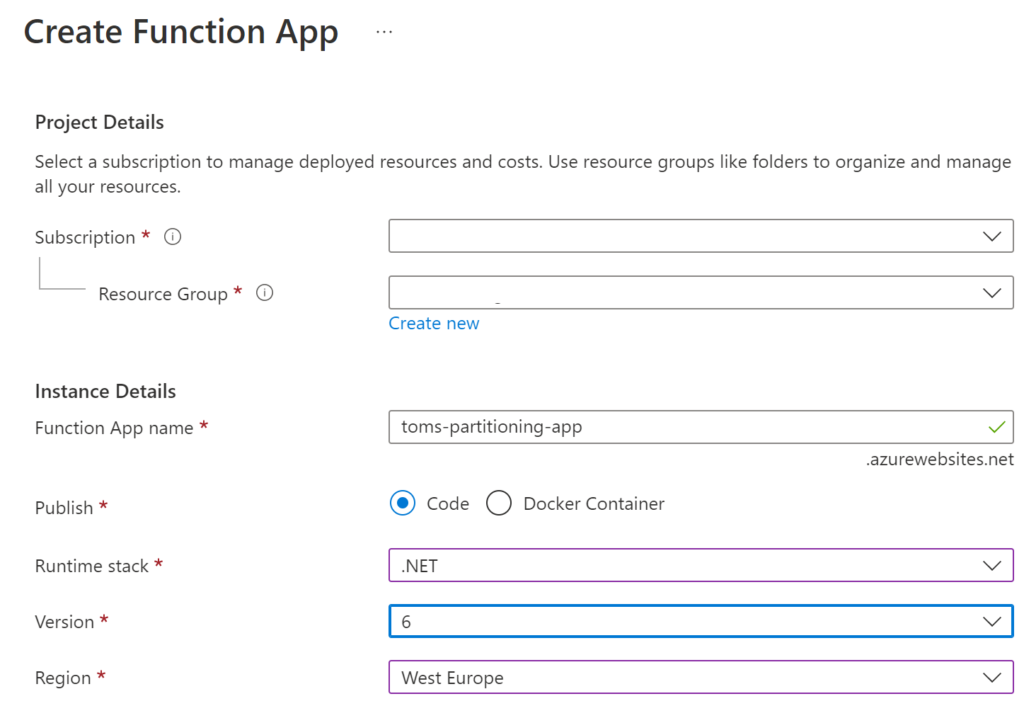
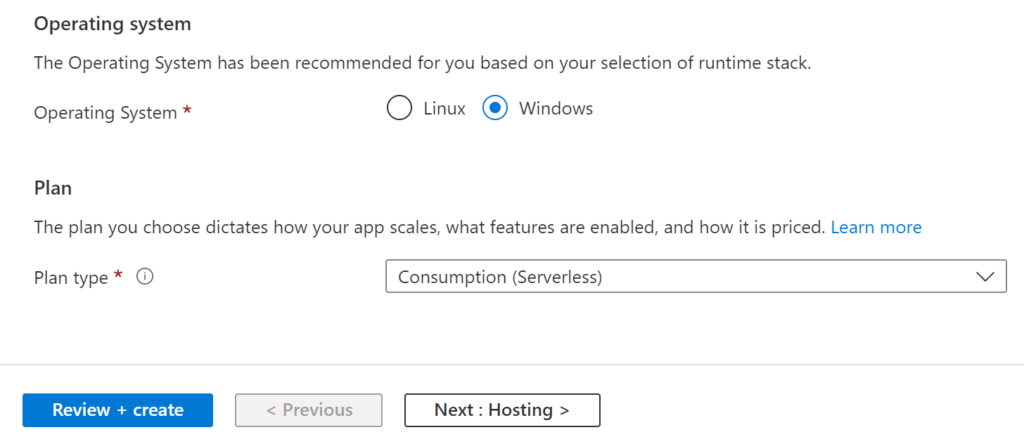
Choose the following settings for the Function App:
.
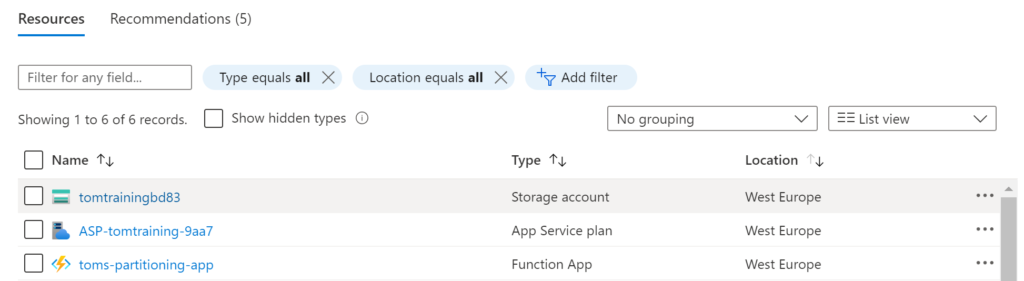
When the resources have been created, Azure created more than one resource: A Storage Account, an App Service Plan and the Function App:
.
The storage account is needed for logging purposes as well as managing triggers. The app service plan resource, on the other hand, contains the hosting plan and provides some additional functionality, such as VNet capabilities. Lastly, the Function App is containing the code that shall be run. In the context of this blog post, we are solely focusing on the Function App.
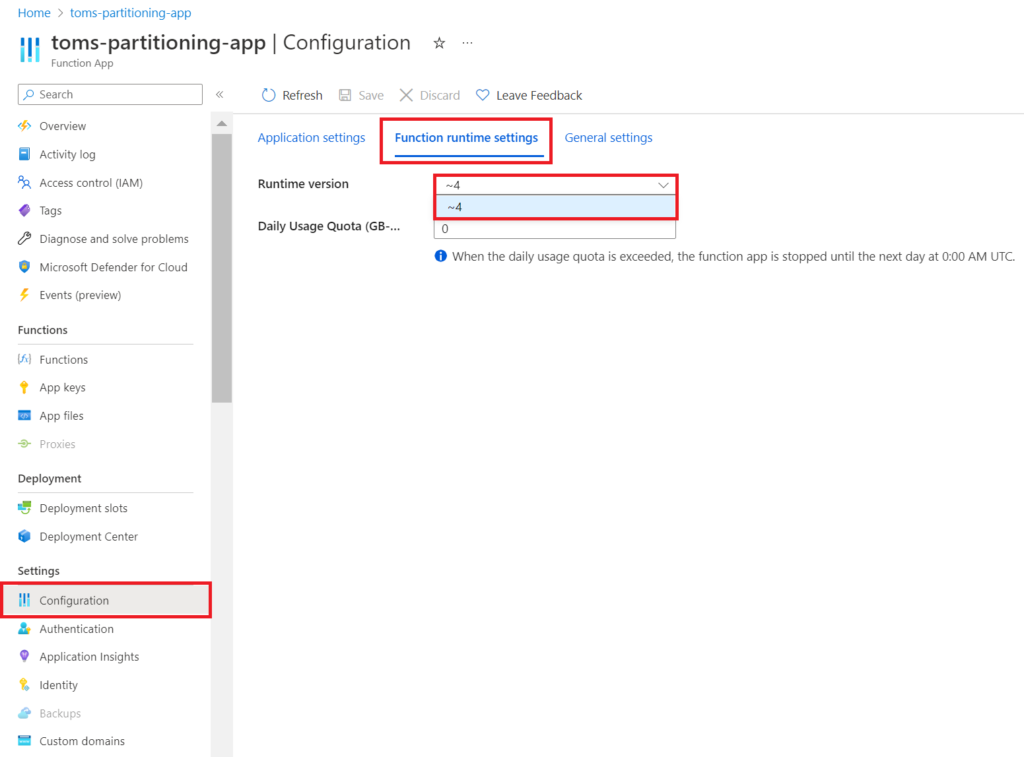
Make sure you are using Runtime version 4:
.
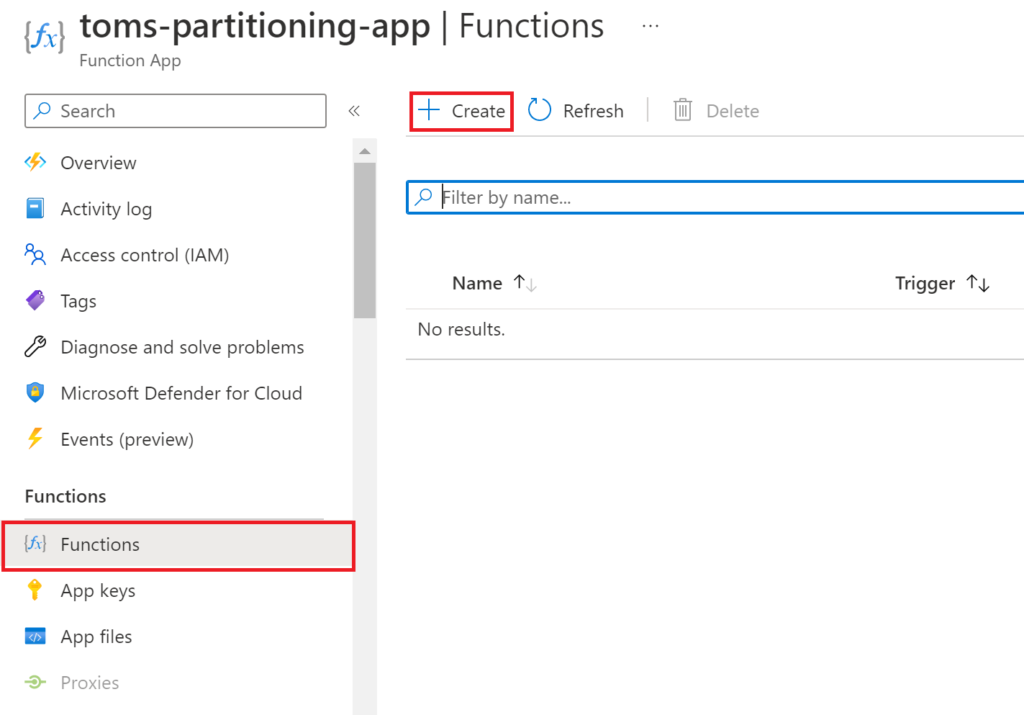
Now, click Functions, press Add and select the HTTP trigger sample.
.
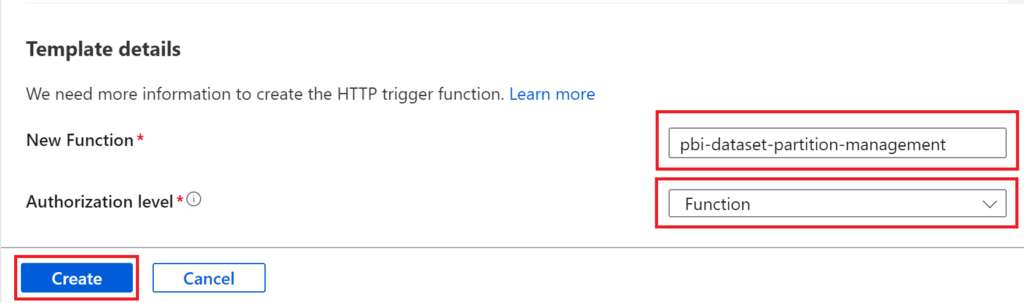
Give the function a reasonable name, pick Function as Authorization level and press Create Function.

.
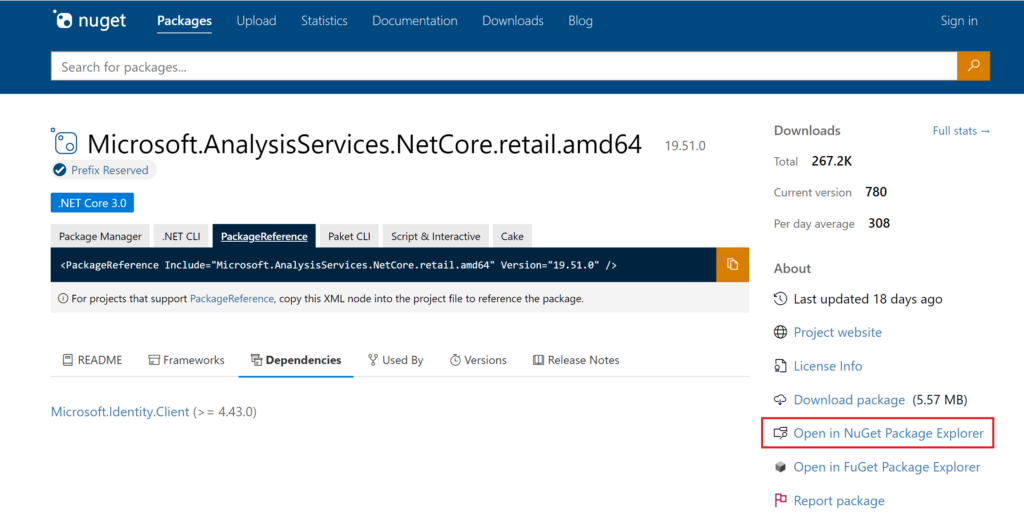
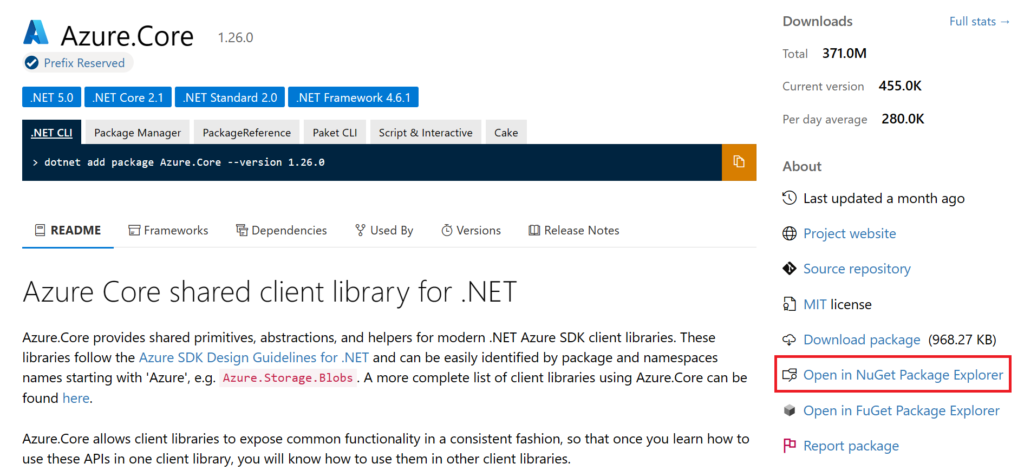
Before we create the code in the function, we need to add the ddl assemblies Microsoft.AnalysisServices.Tabular.dll, Microsoft.AnalysisServices.Core.dll, Microsoft.AnalysisServices.Runtime.Core.dll, Microsoft.AnalysisServices.Runtime.Windows.dll Azure.Identity.dll and Azure.Core.dll from the Analysis Services Client Libraries. Download the packages from here by opening Nuget Package Explorer:
.
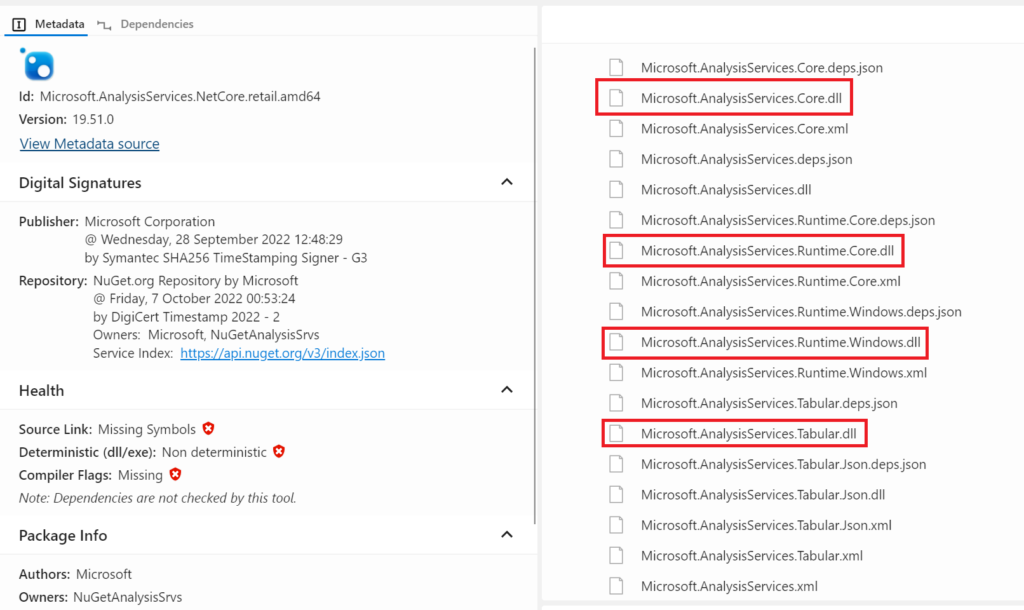
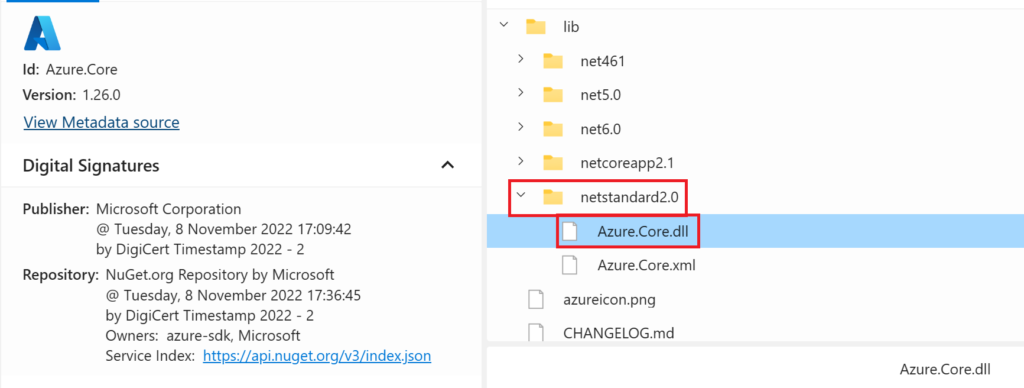
Open the lib folder, then the netcoreapp3.0 and scroll down to find the dll packages:
.
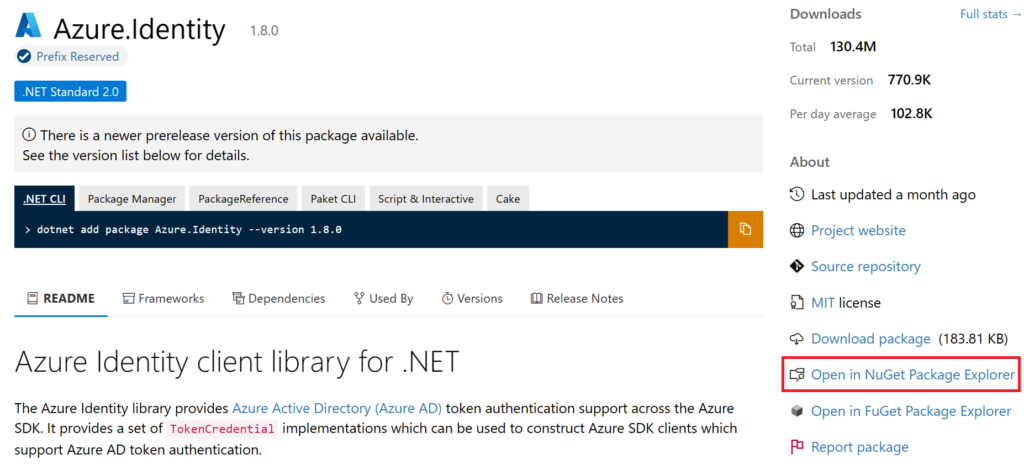
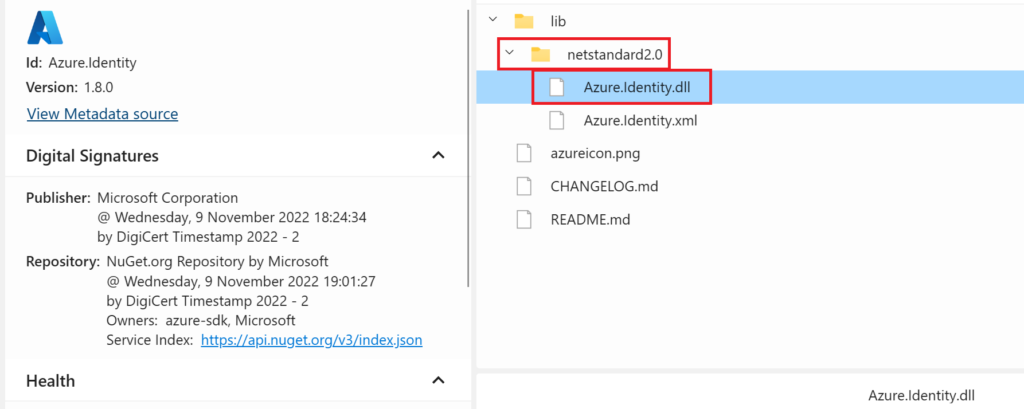
For the Azure.Identity.dll, use this Nuget link and open Nuget Package Explorer:
.
And for the Azure.Core.dll, use this Nuget link and open Nuget Package Explorer:
.
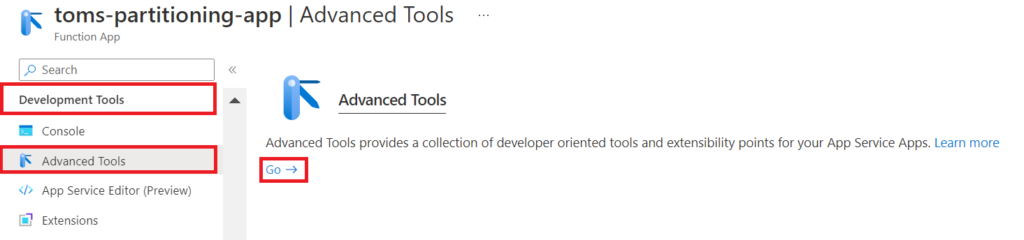
Afterwards, find Advanced Tools under the Development Tools ribbon and click Go.
.
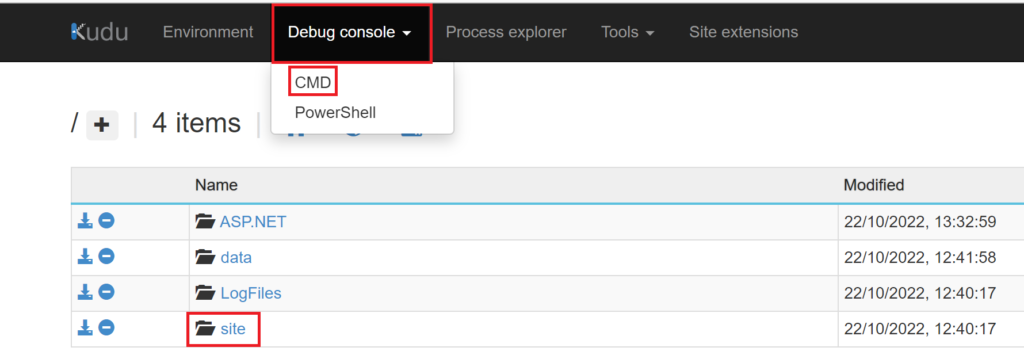
Under Debug console, press CMD and navigate to site > wwroot > YourFunction (pbi-dataset-partition-management)
.
Now, create a New folder called “bin”
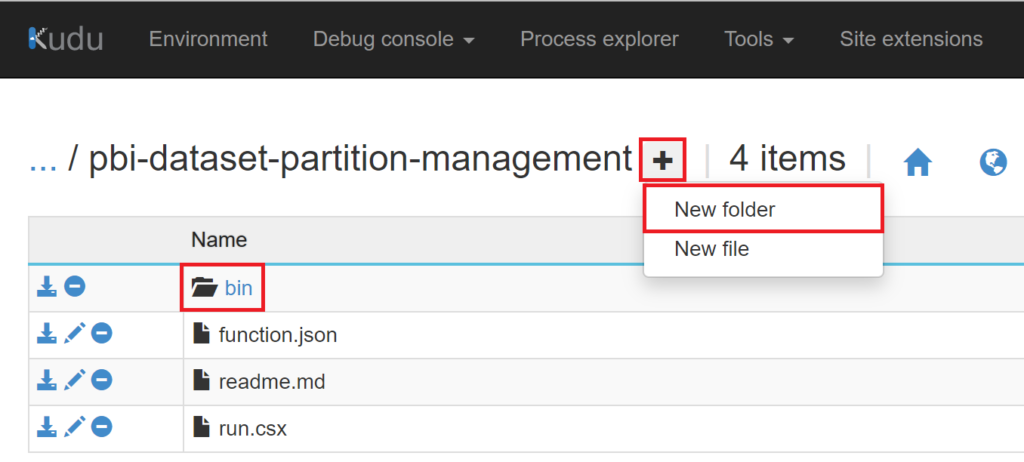
.
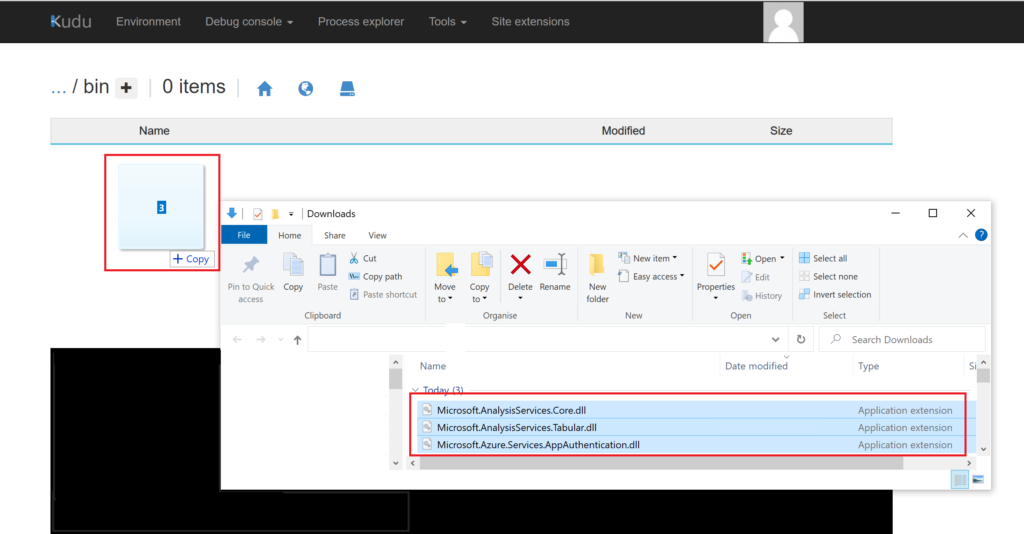
Open the new folder and drag & drop the files Microsoft.AnalysisServices.Runtime.Windows.dll, Microsoft.AnalysisServices.Tabular.dll, Microsoft.AnalysisServices.Core.dll, Microsoft.AnalysisServices.Runtime.Core.dll and Microsoft.Azure.Services.AppAuthentication.dll into the folder:
.
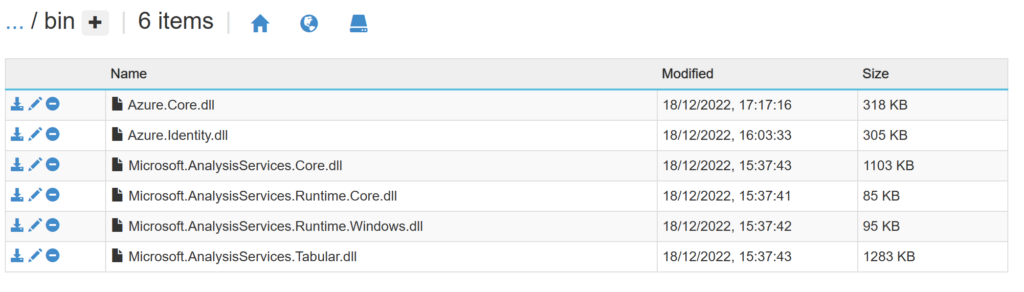
In the end, it should look like the following screen:
.
Now, navigate back to the function. The function.json file shall look like the following. This is the default code if you chose the HTTP sample.
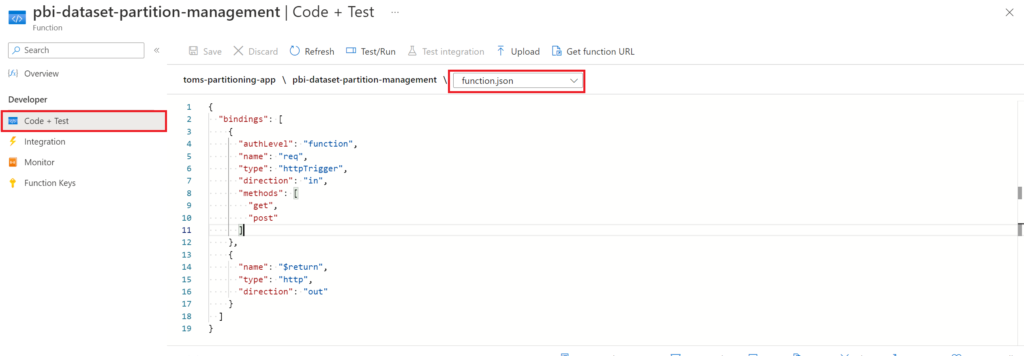
{
  "bindings": [
    {
      "authLevel": "function",
      "name": "req",
      "type": "httpTrigger",
      "direction": "in",
      "methods": [
        "get",
        "post"
      ]
    },
    {
      "name": "$return",
      "type": "http",
      "direction": "out"
    }
  ]
}
.
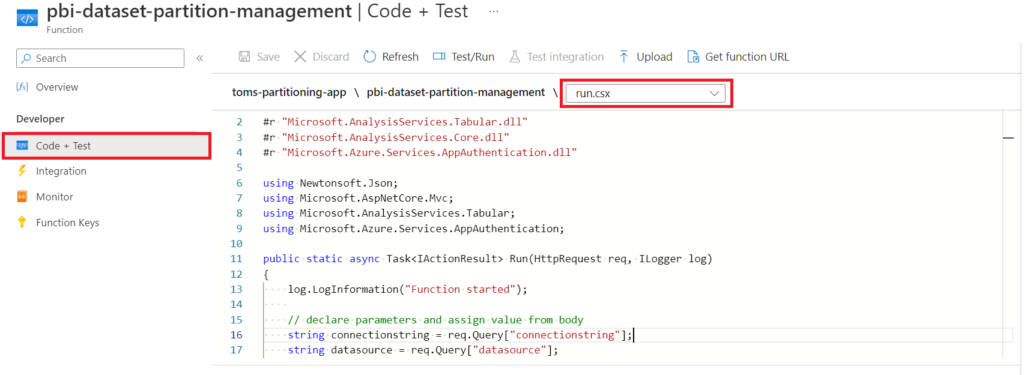
Next, select run.csx and add the code that does the job:
#r "Newtonsoft.Json"
#r "Microsoft.AnalysisServices.Tabular.dll"
#r "Microsoft.AnalysisServices.Core.dll"
#r "Azure.Identity.dll"
#r "Azure.Core.dll"

using Newtonsoft.Json;
using Microsoft.AspNetCore.Mvc;
using Microsoft.AnalysisServices.Tabular;
using Azure.Identity;
using Azure.Core;
public static async Task<IActionResult> Run(HttpRequest req, ILogger log)
{
    log.LogInformation("Function started");

    // declare parameters and assign value from body
    string connectionstring = req.Query["connectionstring"];
    string datasource = req.Query["datasource"];
    string workspace = req.Query["workspace"];
    string dataset = req.Query["dataset"];
    string table = req.Query["table"];
    string partition = req.Query["partition"];
    string sourceobject = req.Query["sourceobject"];
    string partitionstatement = req.Query["partitionstatement"];

    string requestBody = await new StreamReader(req.Body).ReadToEndAsync();
    dynamic data = JsonConvert.DeserializeObject(requestBody);

    connectionstring = connectionstring ?? data?.connectionstring;
    datasource = datasource ?? data?.datasource;
    workspace = workspace ?? data?.workspace;
    dataset = dataset ?? data?.dataset;
    table = table ?? data?.table;
    partition = partition ?? data?.partition;
    sourceobject = sourceobject ?? data?.sourceobject;
    partitionstatement = partitionstatement ?? data?.partitionstatement;
    log.LogInformation("input from body loaded into parameters");
    // get AccessToken to authenticate via Managed Identity
    var tokenCredential = new DefaultAzureCredential();
    var resource = "https://analysis.windows.net/powerbi/api";
    var token = await tokenCredential.GetTokenAsync( new TokenRequestContext( new string[] { $"{resource}/.default" }));
    log.LogInformation("AccessToken fetched from https://analysis.windows.net/powerbi/api");
    // build connection string + connect to the Power BI workspace
    string connStr = $"DataSource=powerbi://api.powerbi.com/v1.0/myorg/{workspace};Password={token.Token};";
    Server pbiserver = new Server();
    pbiserver.Connect(connStr);
    log.LogInformation("Connection to Power BI server established");

    // define variables
    Database db = pbiserver.Databases.GetByName(dataset);
    Model m = db.Model;
    Table t = m.Tables[table];
    log.LogInformation("Power BI objects saved in variables");

    // add data source if it does not exist yet
    if (!(m.DataSources.Contains(datasource)))
    {
        m.DataSources.Add(new ProviderDataSource()
        {
            Name = datasource,
            ConnectionString = connectionstring,
            ImpersonationMode = ImpersonationMode.ImpersonateServiceAccount,
            Provider = "System.Data.SQLClient"

        });
        log.LogInformation("Data source added");
    };

    // drop partition if exists¨
    if (t.Partitions.Contains(partition))
    {
        t.Partitions.Remove(partition);
        log.LogInformation("Partition dropped");
    };

    // add partition with new partition filter constraint
    t.Partitions.Add
    (
        new Partition()
            {
                Name = partition,
                Source = new QueryPartitionSource()
                {
                    DataSource = m.DataSources[datasource],
                    Query = @"SELECT *
                            FROM " + sourceobject +
                            " WHERE " + partitionstatement,
                }
            }
    );
    log.LogInformation("Partition added");

    // save changes to Power BI service
    db.Model.SaveChanges();
    log.LogInformation("Changes saved to Power Bi service");

    // disconnect from Power BI service
    pbiserver.Disconnect();
    log.LogInformation("Disconnected from Power BI service ");

    // return response in JSON format
    string outputResponse =
        @"{
            ""workspace"": """ + workspace + @""",
            ""dataset"": """ + dataset + @""",
            ""table"": """ + table + @""",
            ""partition"": """ + partition + @""",
            ""response"": ""Succesfully updated partition definition to " + partitionstatement + @"""
            }";
    return new OkObjectResult(outputResponse);
}
.
So, what is the script exactly doing? At the very start, the script refers to the TOM assemblies followed by taking in the parameters provided in the request body (see 4. showtime. for an example). Here a short clarification for each of them:
connectionstring = connection string of the data source fetching the table from. Check out the appendix for more information.
datasource = name of the data source fetching the table from. Also, check out the appendix for more information.
workspace = name of Power BI workspace
dataset = name of dataset
table = name of table
partition = name of partition
sourceobject = schema + name of table or view in source
partitionstatement = filter constraint on table
After that, we fetch an access token from https://analysis.windows.net/powerbi/api. Interesting enough, this token comes from the powerbi/api but also works for the XMLA endpoint. This is quite a cool one, because you could use the same token to do different things using different endpoints. This Microsoft documentation explains the phenomenon in more detail (see paragraph Authenticating with an Azure AD access token). Anyway, the script uses the token to authenticate and connect to Power BI. Afterwards, it saves the objects database, model and table in variables and creates the data source. The data source part is needed, because the TOM library expects a data source object in order to create a partition. Once again, I would like to refer to the appendix for more information. Finally, the script drops the partition, recreates it, saves the changes, disconnects from the Power BI service and returns a message in JSON format.
.
3. Fix Power BI access and settings.
Turn on the System Assigned Managed Identity, if it has not already been activated:

.
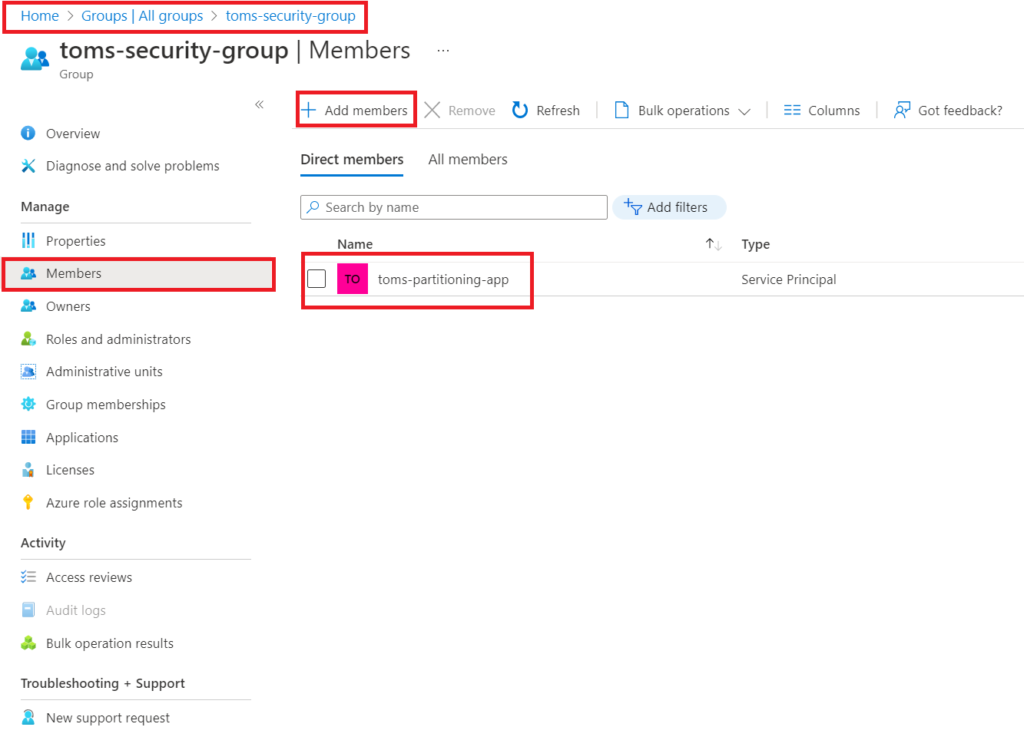
Then, create a security group in Azure and add the function app as a member:
.
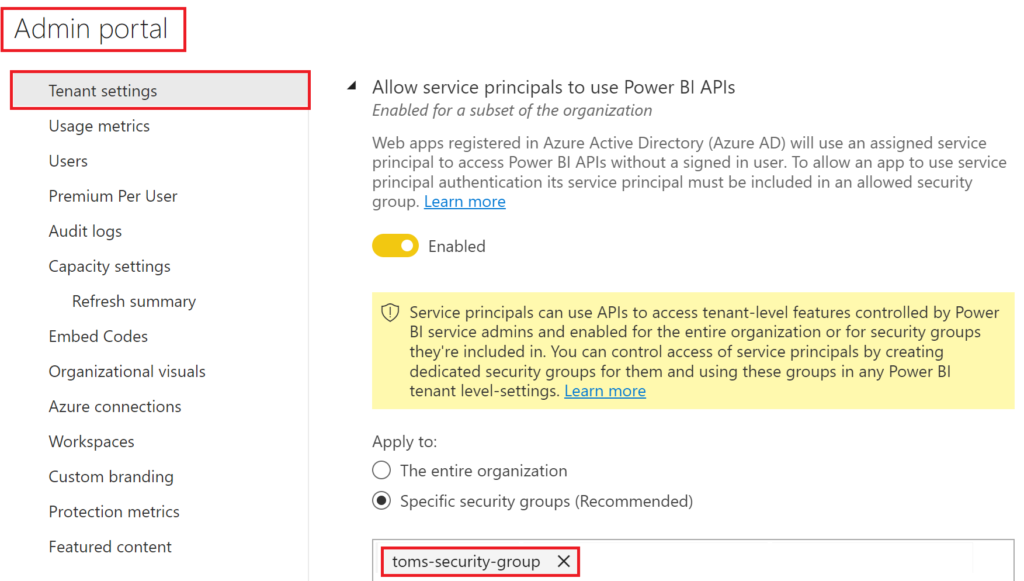
In the Admin portal, add that security group to the Admin API setting that allows service principals to use Power BI APIs.
.
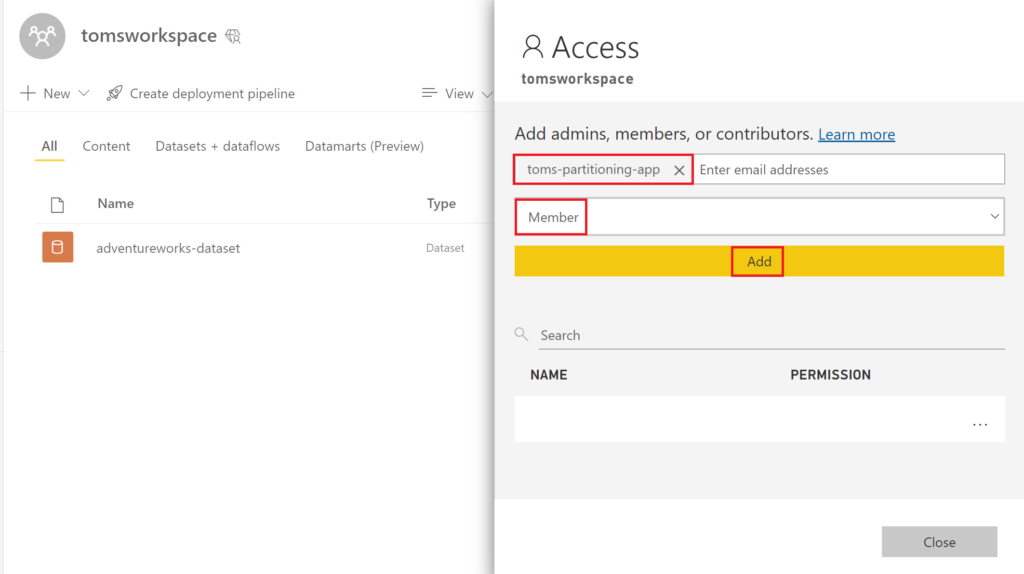
In the following, go into Power BI and add the function to your workspace with the Member role.
.
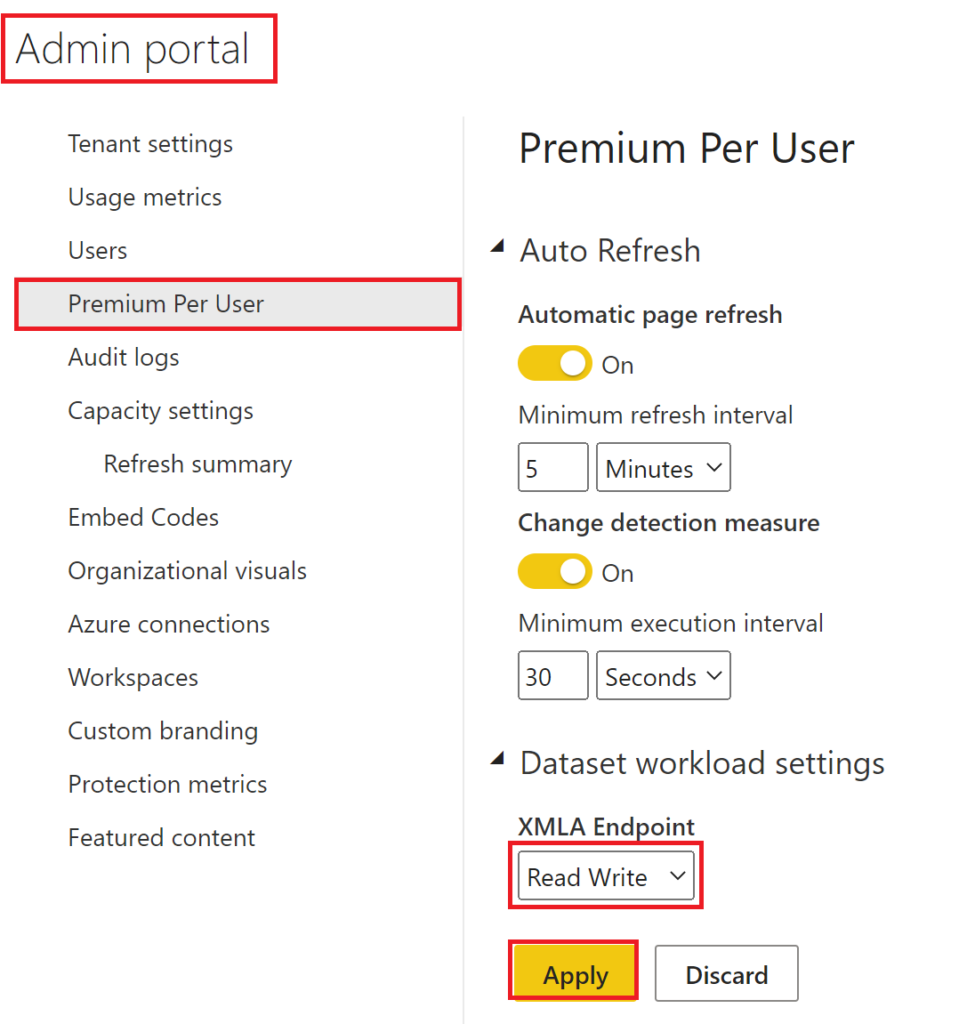
We are almost there! We only need to tell Power BI to allow read/write on XMLA endpoints. For this, navigate to the Admin portal and click on Premium Per User (or Capacity settings depending on what you are using). Finally, pick Read Write in the XMLA Endpoint dropdown:
.
4. Change name of default partition
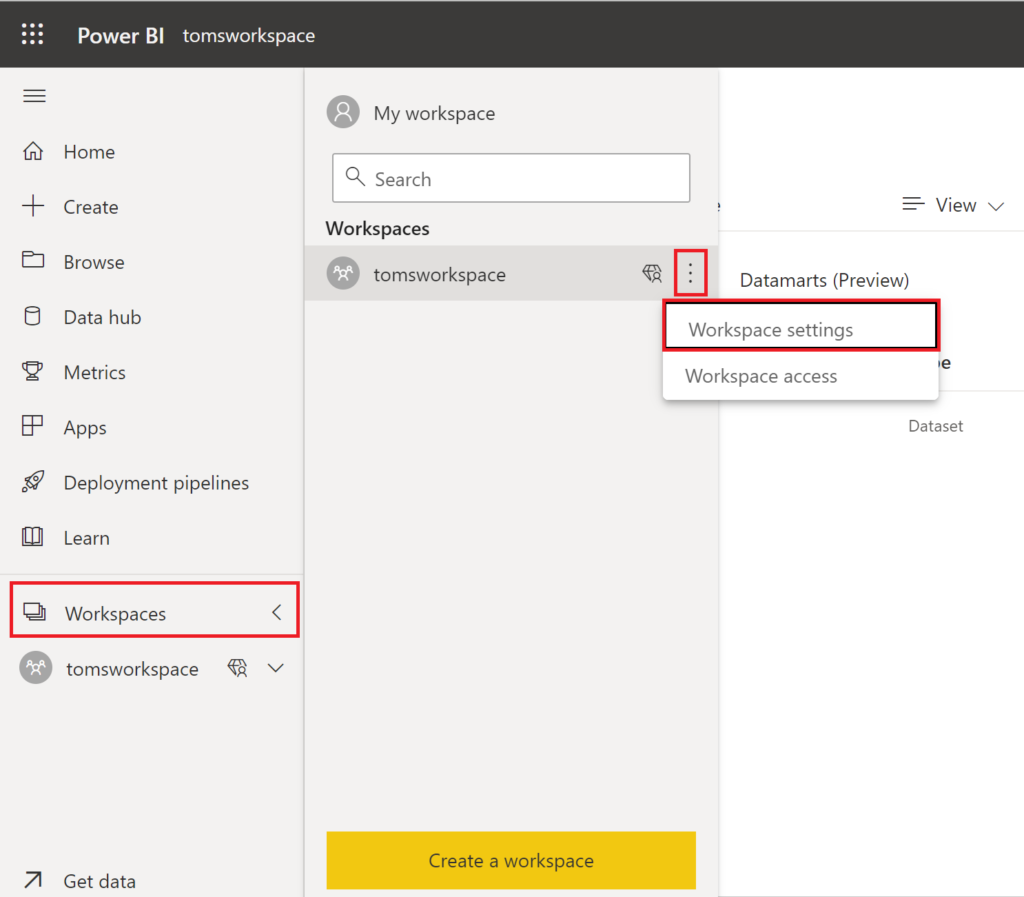
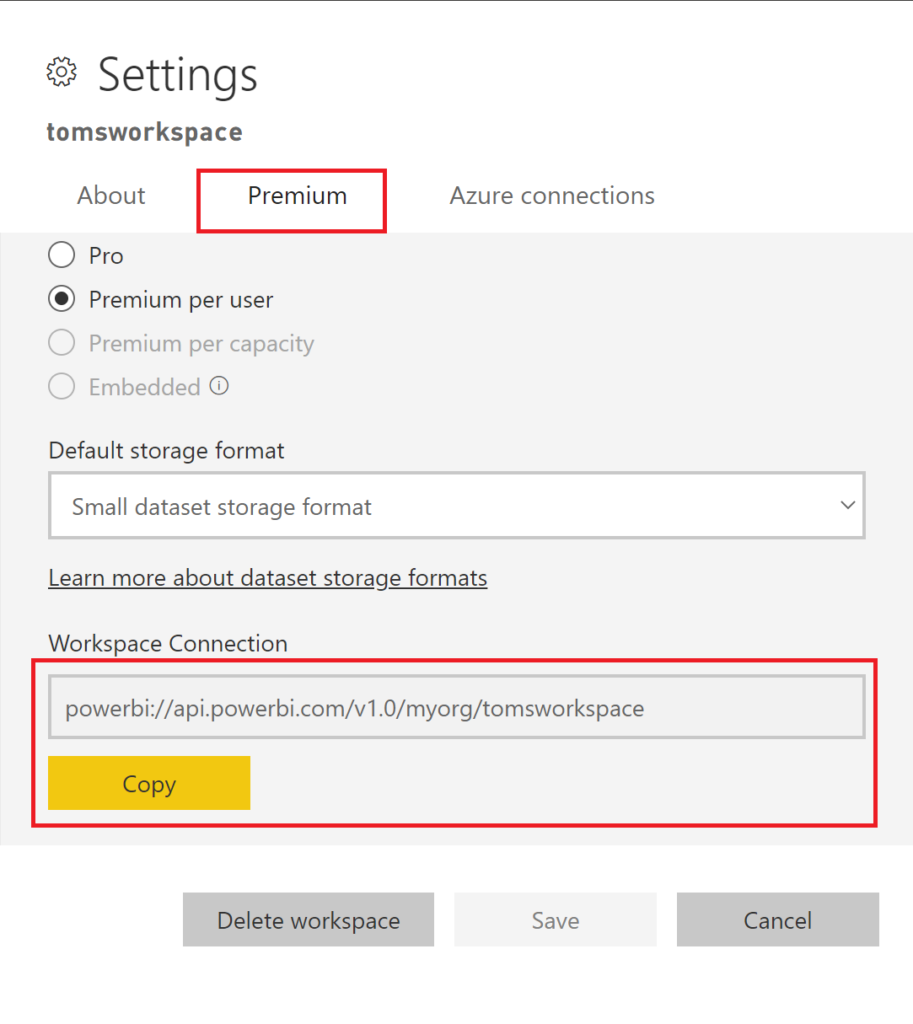
Before we run the function app, I recommend changing the name of the default partition. Otherwise, the script or a later table / partition refresh might fail. Just connect to your workspace via SSMS by first copying the Workspace Connection from Power BI:
.
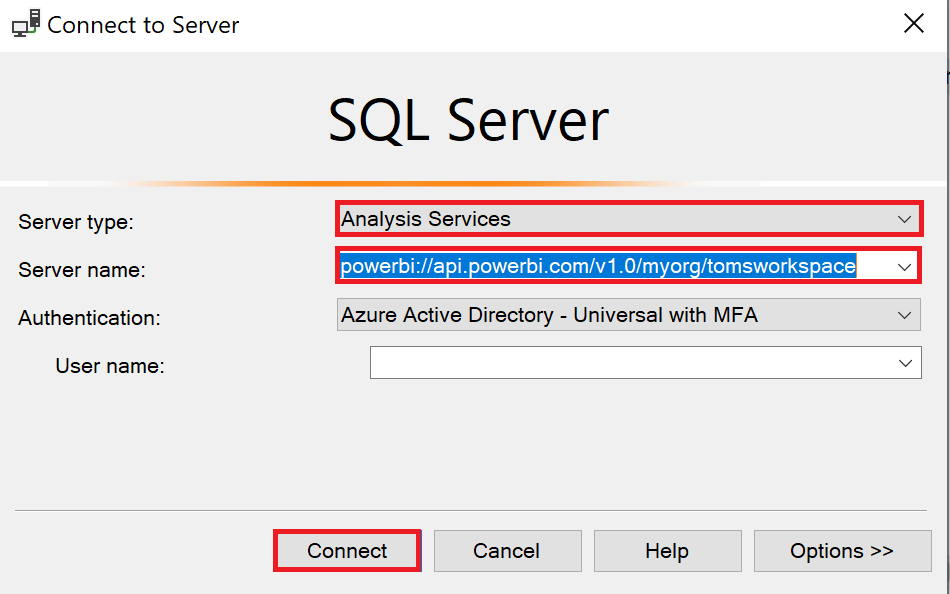
Open SSMS and the Connect to Server window, select Analysis Services as Server type, paste the copied connection string into Server name and click connect.
.
Now, right-click on the table that you would like to partition and select Partitions…
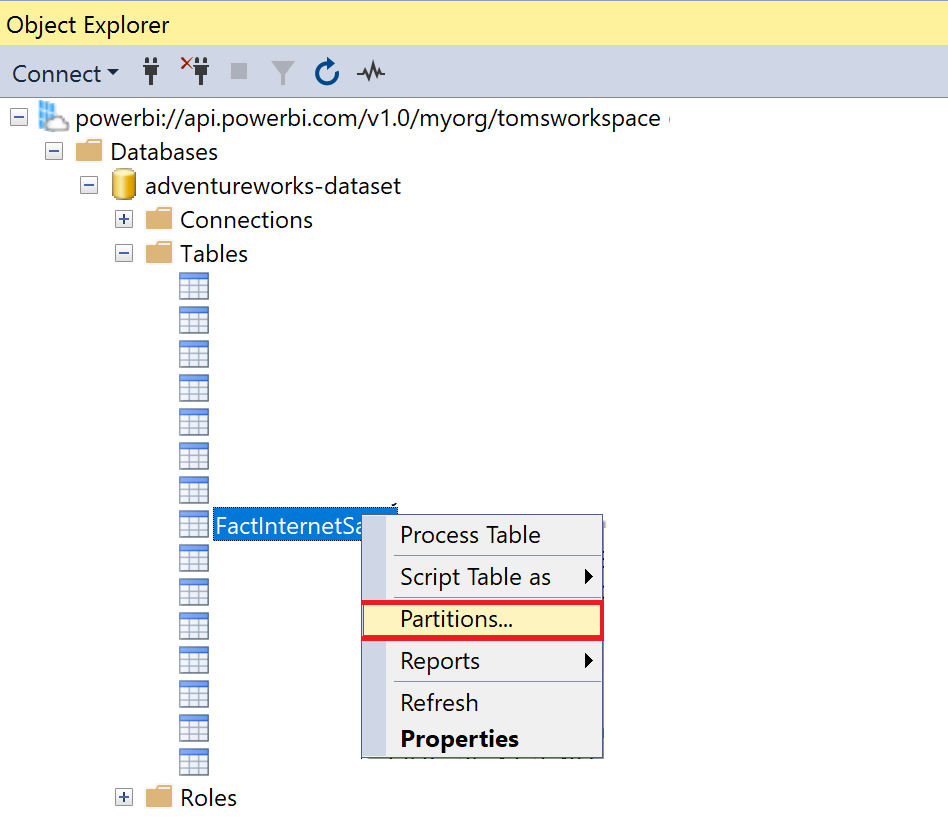
.
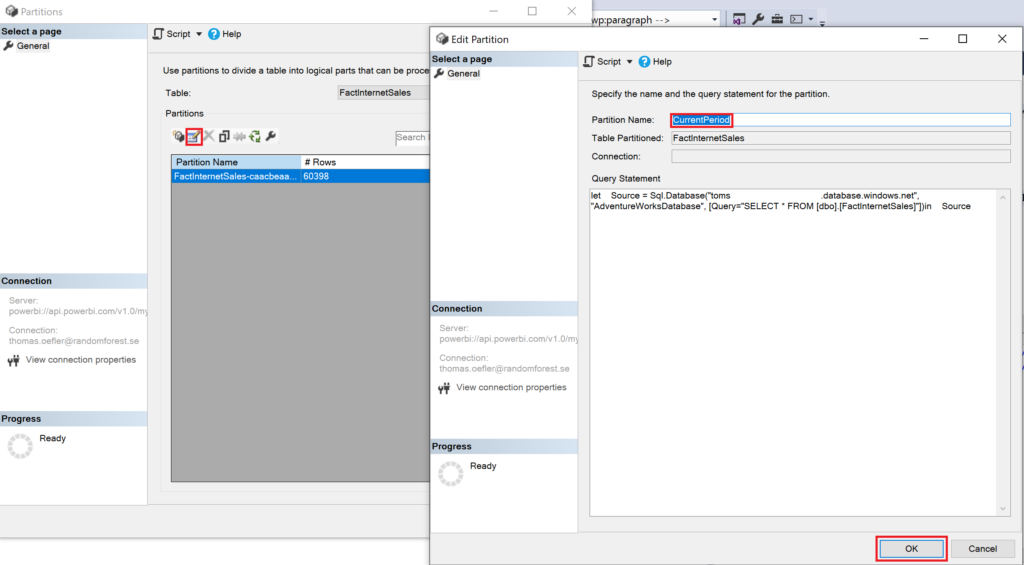
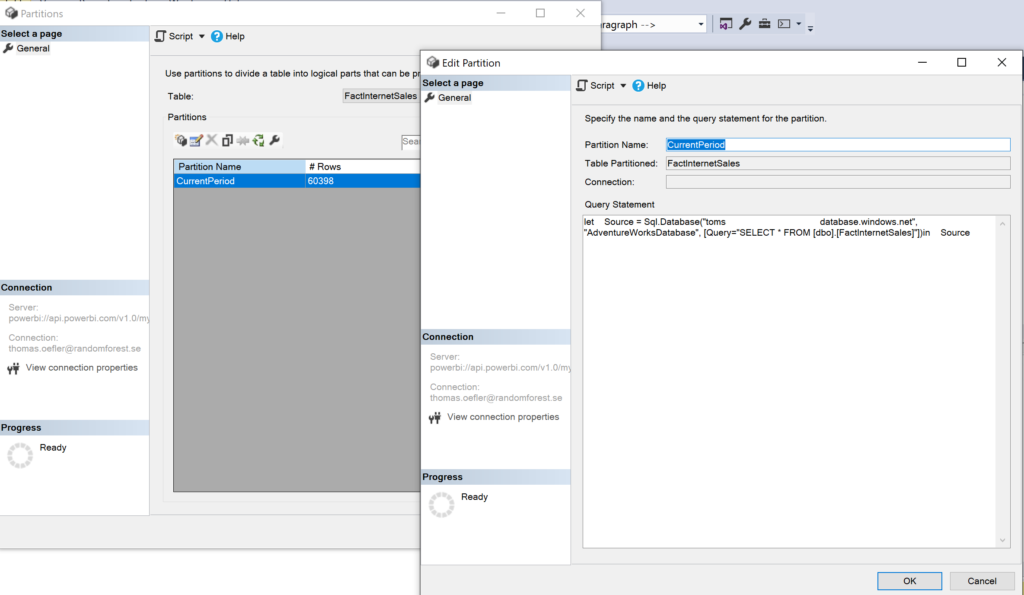
Here, you should see the default partition. Click the Edit button and change the Partition Name to the name of one of the partitions you are going to use. Here, we are choosing CurrentPeriod.
.
5. Showtime!
Time to run our partitioning function app! Once again, let’s see what our fact table looks like before we run the function app for the first time. The fact table consists of one partition called CurrentPartition containing all 60.000 rows:
.
Now showtime! Let’s run it!
.
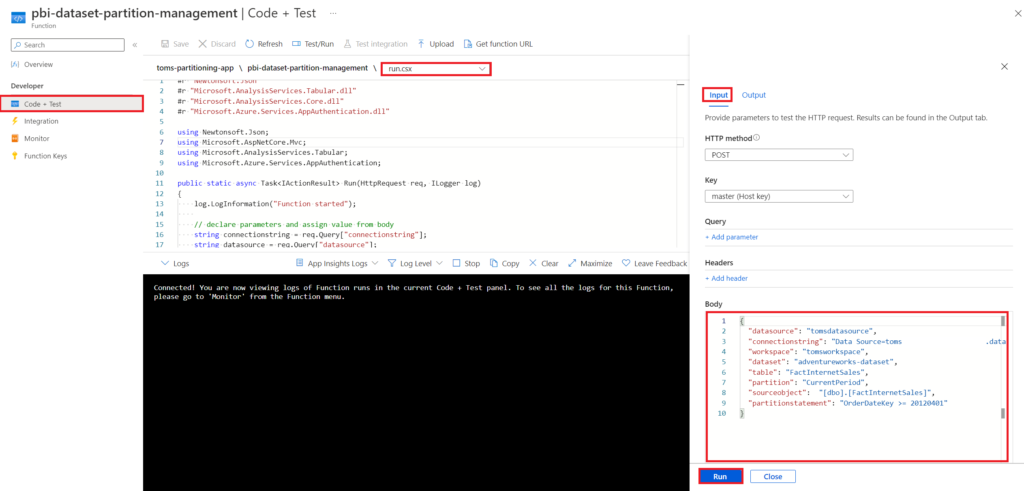
For the example above, we use the body below:
{
"datasource": "tomsdatasource",
"connectionstring": "Data Source=toms[...].database.windows.net;Initial Catalog=AdventureWorksDatabase;Encrypt=true",
"workspace": "tomsworkspace",
"dataset": "adventureworks-dataset",
"table": "FactInternetSales",
"partition": "CurrentPeriod",
"sourceobject": "[dbo].[FactInternetSales]",
"partitionstatement": "OrderDateKey >= 20120401"
}
.
In the following, the response we should get back:
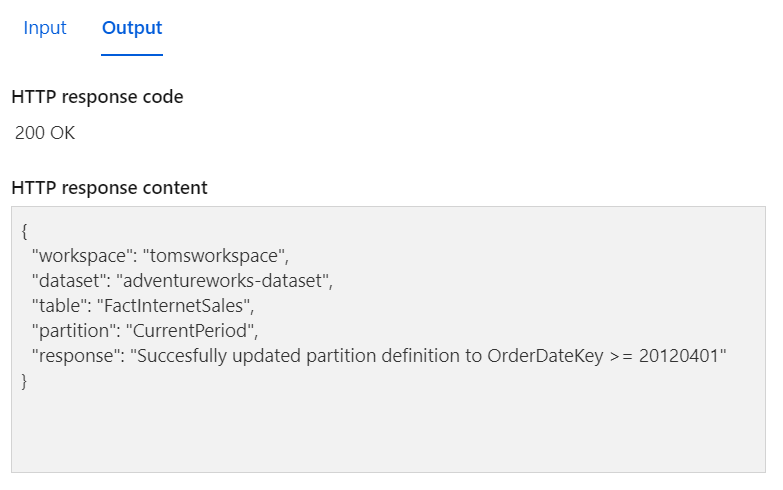
.
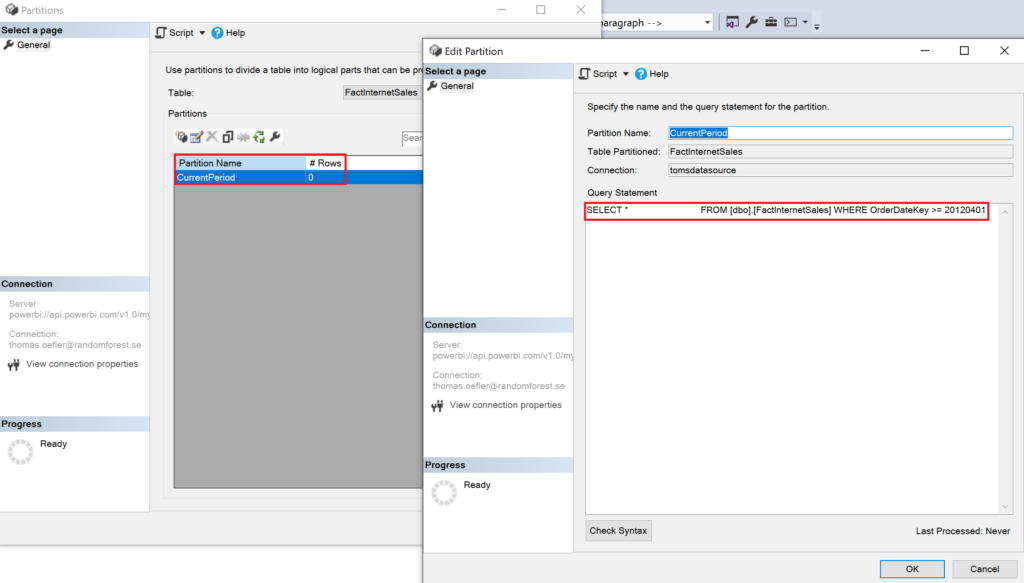
Back to SSMS, let’s check how the partition actually looks like:
.
Here we go! The CurrentPeriod has been updated with a filter constraint. Worth mentioning is that the partition does not contain any rows. This is because the partition is dropped before it is recreated with the new constraint. The function does neither process the table. You could refresh the whole table or the specific partition from another function app or integrate the code from that blog post into the script here. Of course, it would also work to trigger a refresh from any other client, for instance from a web activity in a data factory. Let’s add the other partitions PreviousPeriod and Archive by running the function app with the below bodies:
{
"datasource": "tomsdatasource",
"connectionstring": "Data Source=toms[...].database.windows.net;Initial Catalog=AdventureWorksDatabase;Encrypt=true",
"workspace": "tomsworkspace",
"dataset": "adventureworks-dataset",
"table": "FactInternetSales",
"partition": "PreviousPeriod",
"sourceobject": "[dbo].[FactInternetSales]",
"partitionstatement": "OrderDateKey >= 20120101 AND OrderDateKey < 20120401"
}
{
"datasource": "tomsdatasource",
"connectionstring": "Data Source=toms[...].database.windows.net;Initial Catalog=AdventureWorksDatabase;Encrypt=true",
"workspace": "tomsworkspace",
"dataset": "adventureworks-dataset",
"table": "FactInternetSales",
"partition": "Archive",
"sourceobject": "[dbo].[FactInternetSales]",
"partitionstatement": "OrderDateKey < 20120101"
}
.
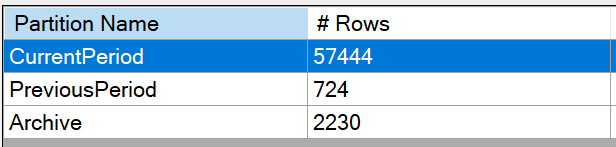
And here, all three partitions after manually processing them:
.
end.
The function app is not containing too much logic, meaning it is very generic and can be used in many use cases. On the other hand, you need to build the partitionstatement somehow beforehand and parse it properly into the request body – preferably in a completely dynamic and automated way. Also, the most elaborate partition strategy, design and implementation on a Power BI semantic model, will not help you the slightest bit, if your data source is too slow. So for instance, when Power BI tries to refresh a certain partition of a table, but the data source needs to do a full table scan (that is reading the whole table) you would not have gained anything. For that, consider a proper index or to match the partitions that you use in Power BI with the respective table in the data source. In the next blog post, there will be a walkthrough on how to achieve this by applying the function in a data factory pipeline and mirroring the table partitions in the Power BI semantic model with the respective table in the source. On a last note, two recommendations. First, make sure none of the partitions overlap! Otherwise, you’ll run into problems when refreshing the table. Second, calculated columns in a partitioned table, will always be recalculated for the whole table, even if you only refresh just one partition. Yet another reason to stand back from using calculated columns.
.
appendix.
First off, I highly recommend reading through the blog post Using XMLA endpoints to change data sources in a Power BI semantic model | Microsoft Power BI Blog | Microsoft Power BI by Kay Unkroth. There are plenty of useful tips concerning data sources in Power BI strongly impacting metadata structure and thereby custom table partitioning. Because Power BI does not store data source credentials in the semantic model (nor in the workspace) there is no need for explicitly specifying data sources. This means, anytime you push semantic models from Power Bi Desktop, there are no explicit data sources / connections defined:
.
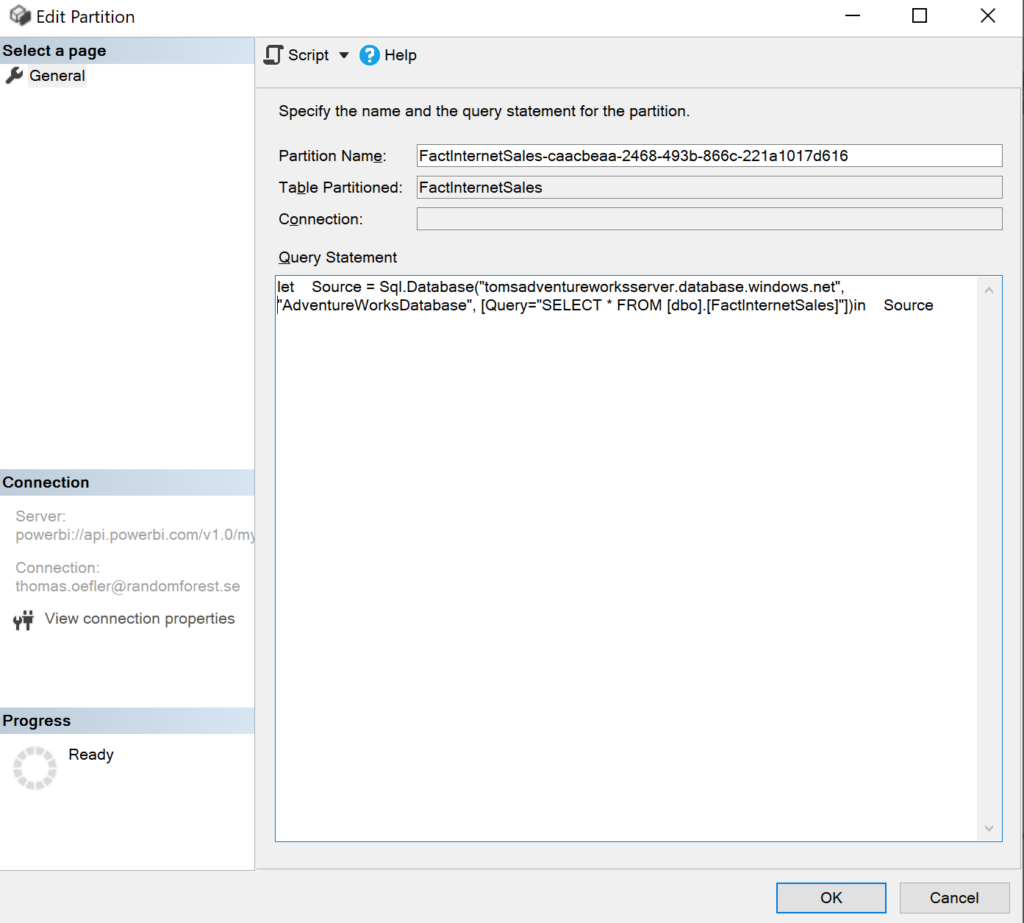
Since Power BI does not store any sensitive data source information (like credentials or privacy settings) in the semantic model, you cannot get access to them by downloading the semantic model or investigating meta data. If we check the partition for FactInternetSales, we can see the M code where the data source is specified:
.
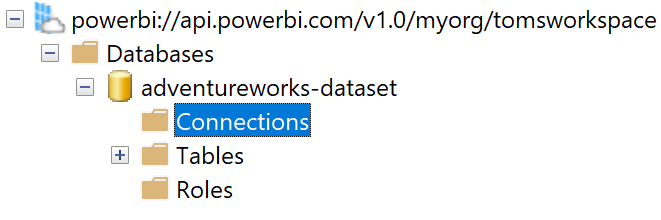
Under the hood, Power BI tries to recognise and locate that data source (written in M) in the Service. If it cannot find it, one needs to go into Power BI and update the data source settings like credentials or privacy levels. However, Power BI does not have a problem if you define an explicit data source via XMLA through other tools like tabular editor, visual studio or as we do it in a function app. You might have noticed after running the function, a connection popping up:
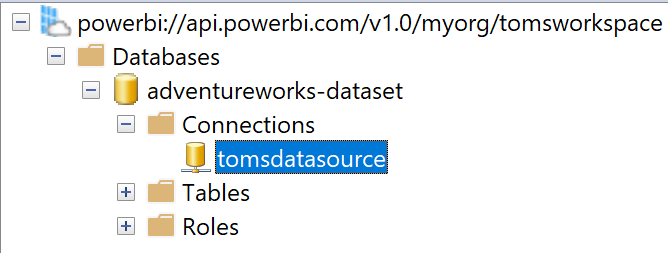
.
Note, you still cannot push sensitive data source information to Power BI. If you try to, Power BI will just ignore it. Worth noticing, if you want to utilise the TOM assembly, it appears, that you need to have an explicit data source in place. I reckon this is some legacy from Analysis Services where TOM originates from. Presumably, an explicit data source is default in Analysis Services. Thus, we need to create the explicit data source in the function app before changing the partitions.
[…] options than TMSL, but you’ll have to use C# and it relies on .Net libraries so you’ll have to jump through hoops to execute your scripts in the […]