
how to set a service principal as the owner of a power bi semantic model (former dataset).

introduction.
When you push a semantic model to Power BI, the account used for publishing automatically becomes the owner of the semantic model. It doesn’t matter whether a service principal or a personal account deploys the semantic model: The one who publishes it, owns it – and this is not always a desired outcome. For instance, with the OAuth2 authentication method, the credentials of the semantic model owner are utilised to fetch a token. This token enables the Power BI service to authenticate to the data sources. So, anytime a semantic model refresh is triggered, that exact token is used. For security reasons, this token will expire after a certain time. The semantic model owner may then need to re-enter credentials in order to keep the token up-to-date. Even if you did not need to refresh the token, you could run into problems when the semantic model owner left the organization.
To avoid such issues, you can switch ownership of the semantic model to a dedicated service principal using the following PowerShell script as part of your Azure DevOps release routine. The second part of the script refreshes the access token and thereby the data source connection. Outsourcing this part could be useful to automate the refresh token on a regular schedule or simply right before a semantic model refresh is triggered. By the way, I have seen solutions where a Python script is used with the same purpose. But instead of running the script as part of a CICD process, they just run it right before a semantic model refresh is triggered from that exact same Python script. This is also a way.
This blog post provides step-by-step instructions for implementing the solution, which can enhance the security and reliability of your Power BI semantic models. Of course, you could just take the PowerShell as is, if you want to use another CICD tool.
.
prerequisites.
1. A Power BI semantic model (the one in this blog post is called tomsdataset) published to a workspace (tomsworkspace)
2. An Azure DevOps project (tomsazuredevopsproject) with appropriate user rights to create release pipelines and a repo in place (tomsrepository)
3. A service connection in Azure DevOps (tomsazuredevopsserviceconnection) that can connect to Azure via a service principal (serviceprincipal-tomsazuredevopsproject)
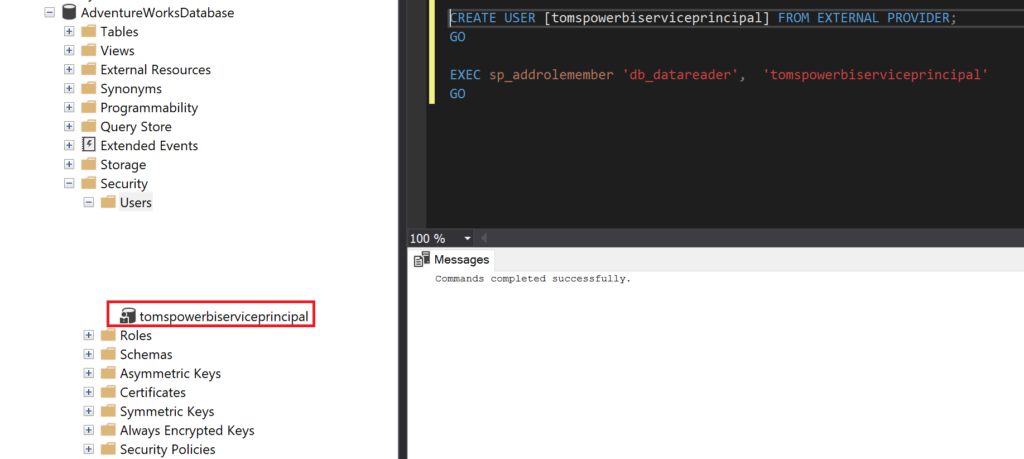
4. A service principal (tomspowerbiserviceprincipal) that shall become the owner of the semantic model and that has access rights to the data sources following the principal of least privilege. This service principal needs to have the member role on the Power BI workspace and access to Power BI APIs via a security group.
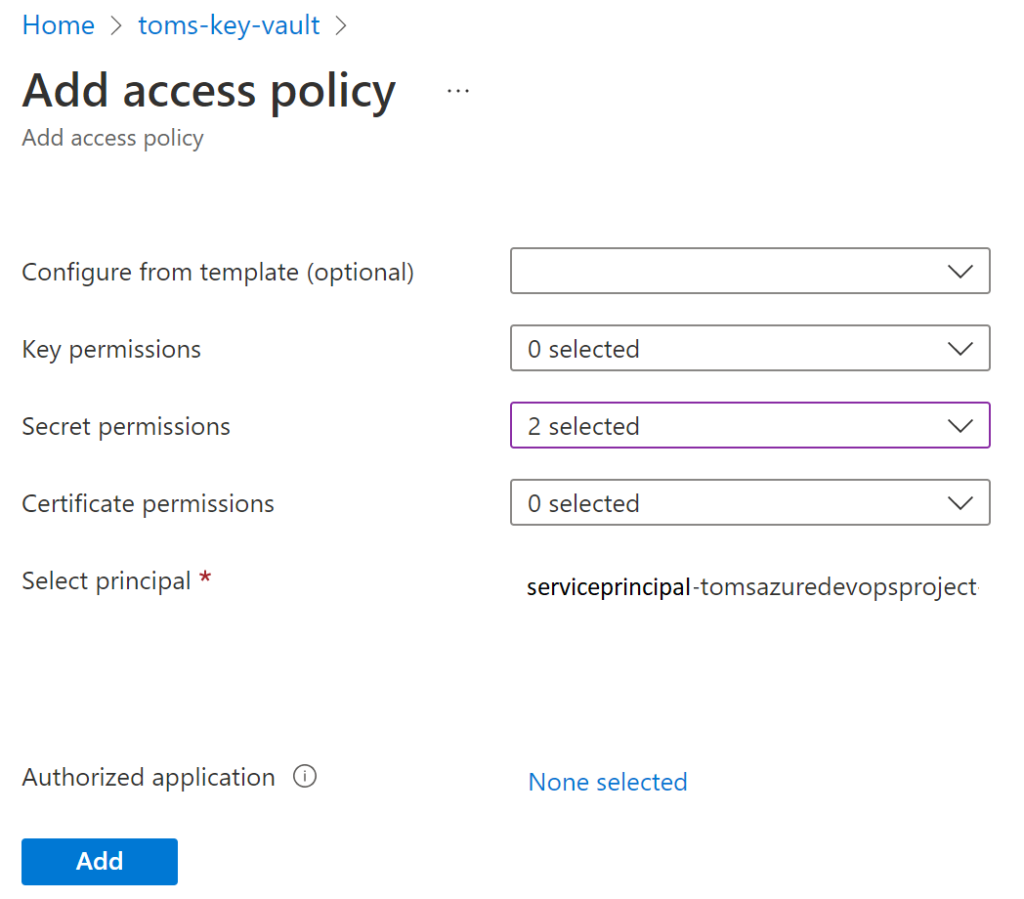
5. An Azure Key Vault (toms-key-vault) storing the credentials of the service principal (clientid-service-principal & secret-service-principal). The service principal that is used by the service connection in Azure DevOps (serviceprincipal-tomsazuredevopsproject) needs get and list permission for the key vault
.
plan of action.
1. What is our starting point?
2. The powershell script
3. Create the release pipeline
4. Showtime!
.
1. What is our starting point?
Since there are quite a few prerequisites, let’s have a quick walkthrough on what we already have in place.
a. A Power BI report called tomsdataset that works as our semantic model with a data source from an Azure SQL Database AdventureWorksDatabase:
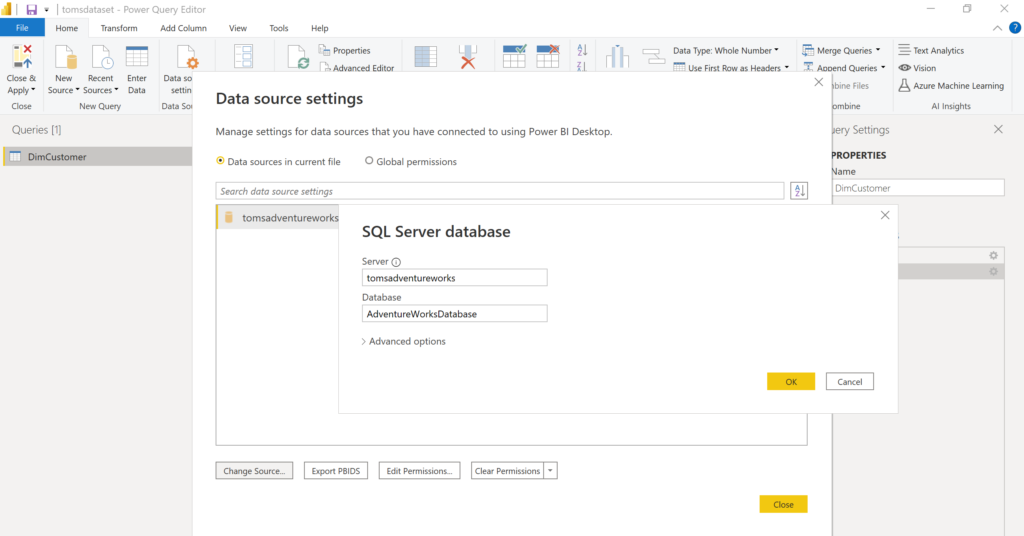
By the way, the AdventureWorksDatabase in this post is not the lightweight version from Azure. If you’d like to find out how to deploy the real AdventureWorksDatabase sample to an Azure SQL Database or if you are in need for a higher volume of lab data than the Azure sample databases, read this blog post.
.
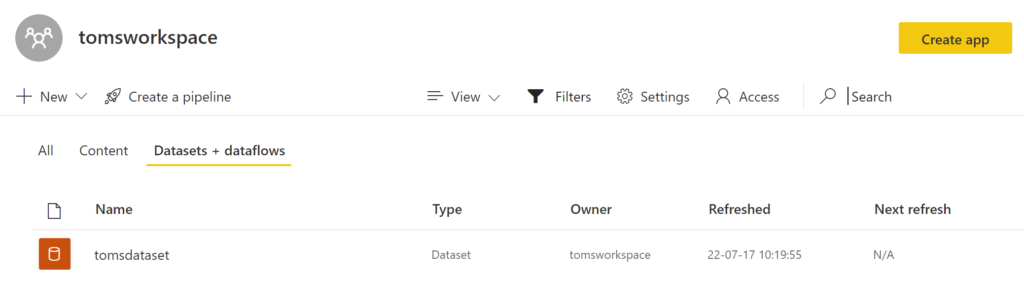
b. The semantic model tomsdataset being published to the workspace tomsworkspace in powerbi.com:
.
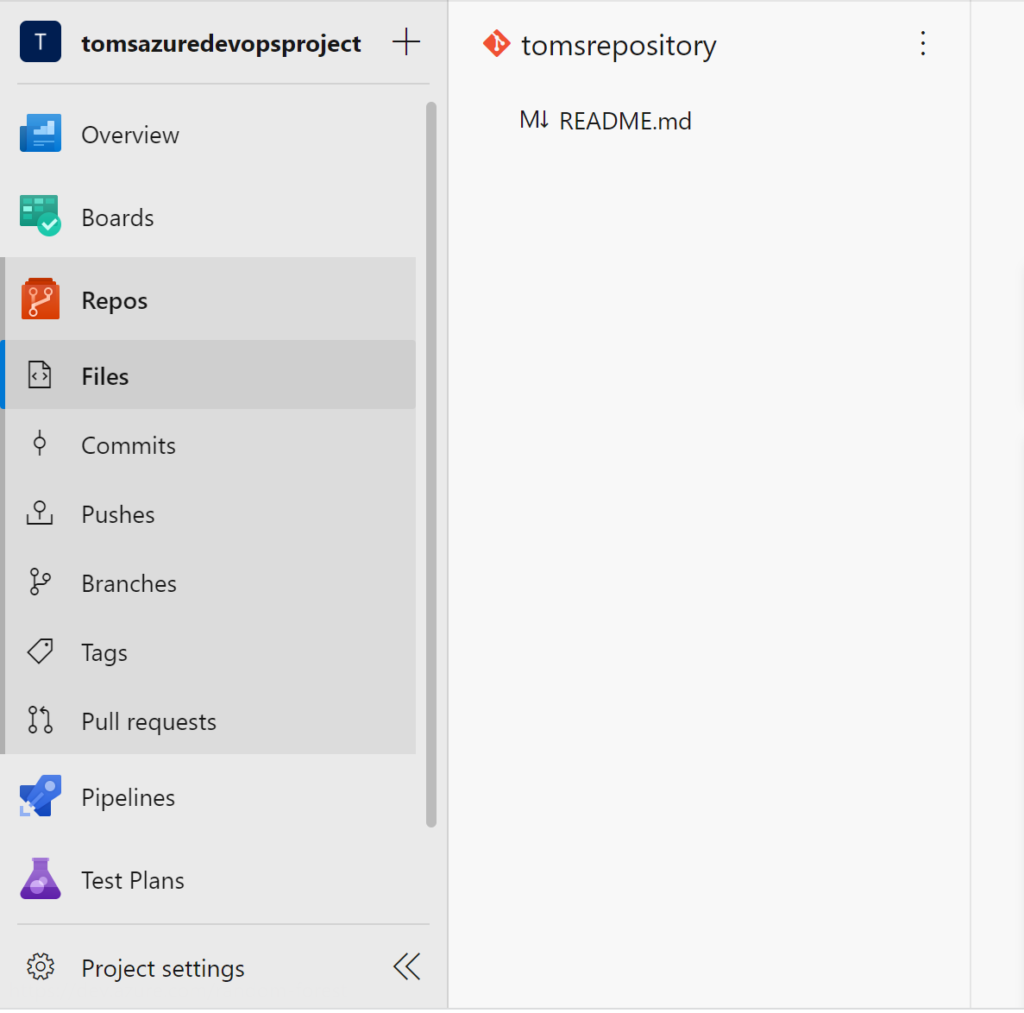
c. An Azure DevOps project tomsazuredevopsproject with a repository tomsrepository:
.
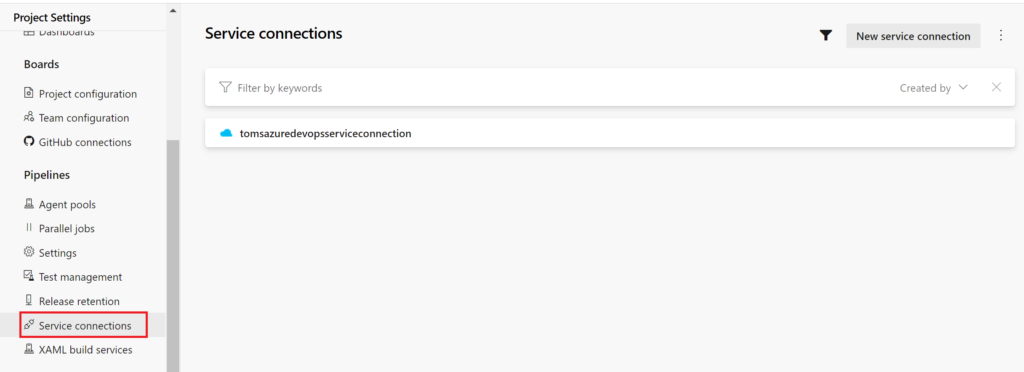
d. A service connection in Azure DevOps tomsazuredevopsserviceconnection that has access to Azure via the service principal serviceprincipal-tomsazuredevopsproject:
.
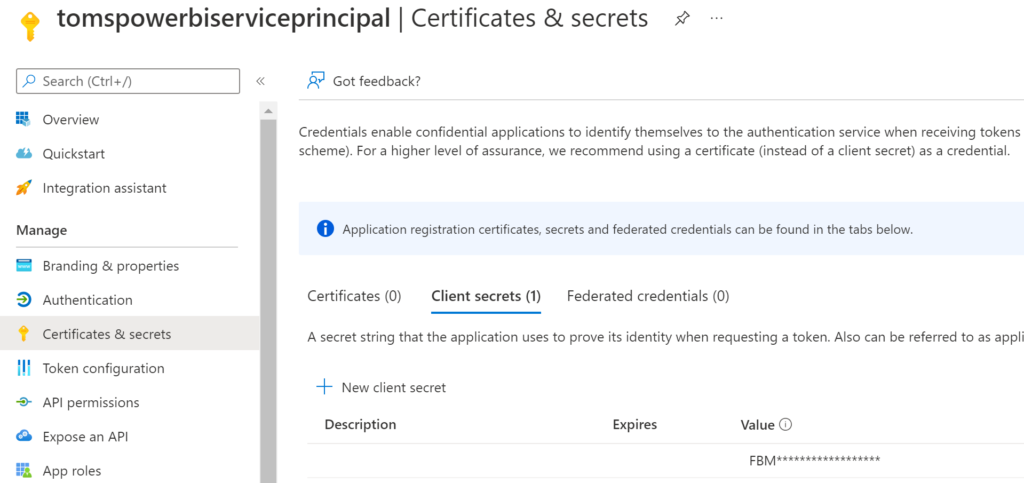
e. A service principal tomspowerbiserviceprincipal with a secret:
.
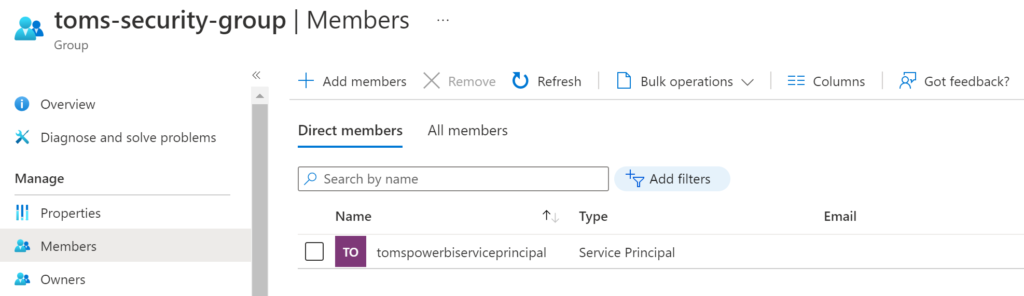
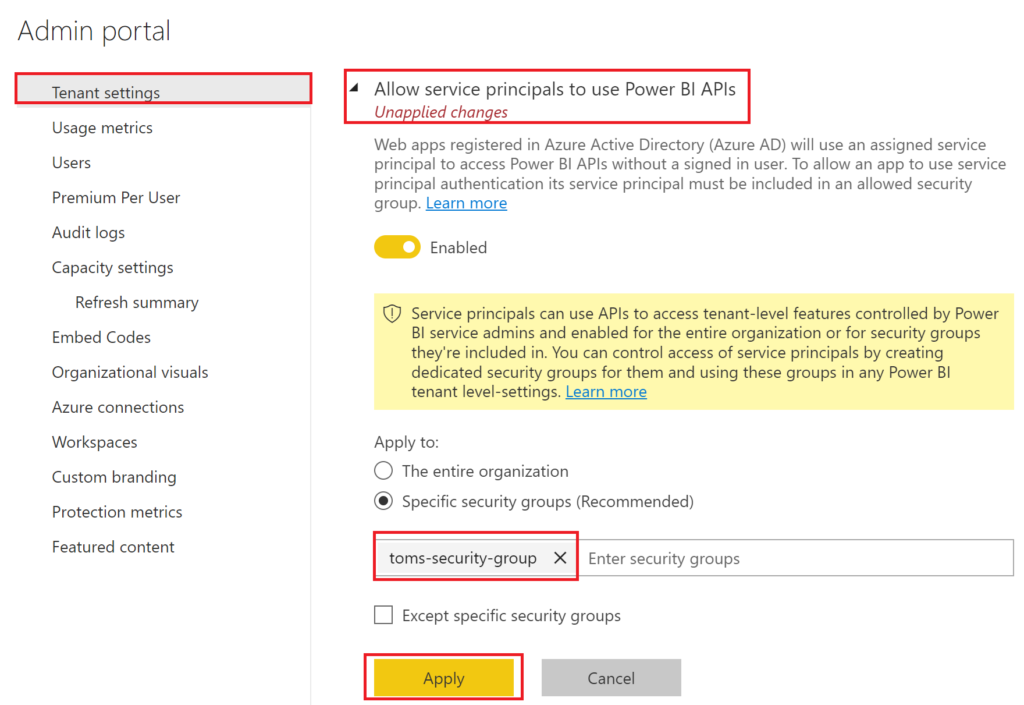
f. A security group toms-security-group that contains the service principal tomspowerbiserviceprincipal as a member. The security group needs to be allowed to use Power BI APIs, too.
.
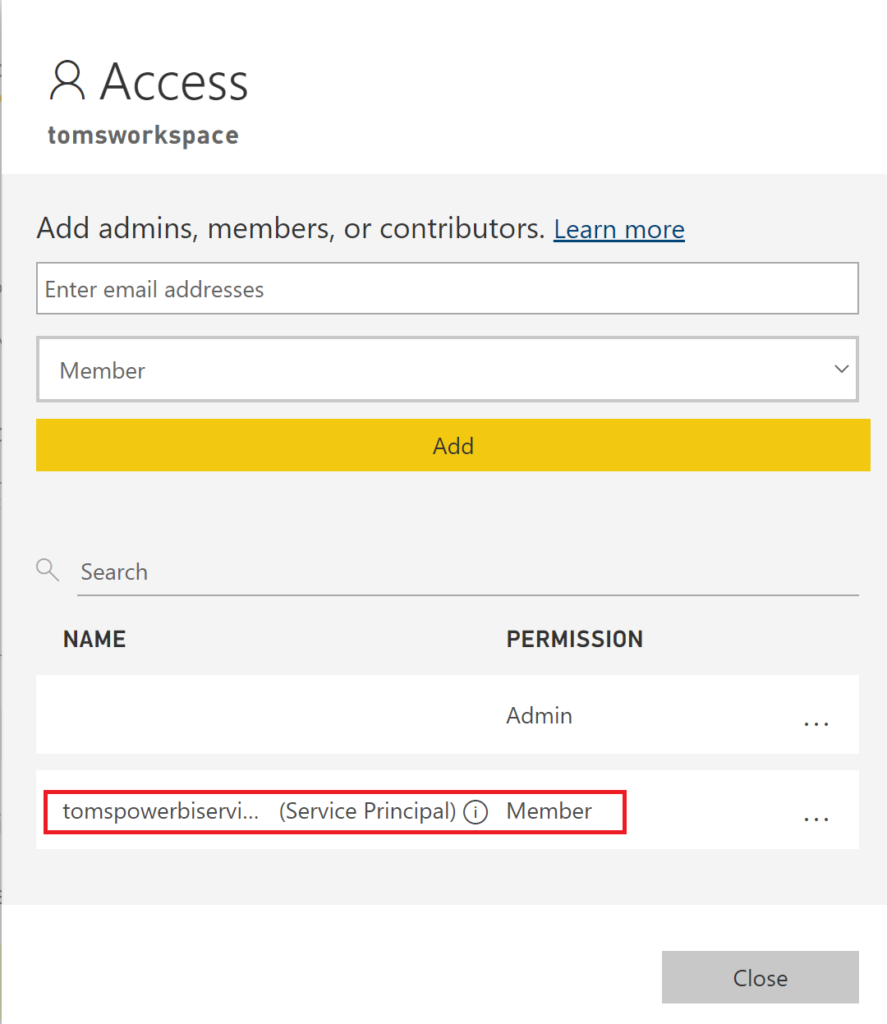
g. An access policy providing member access for service principal tomspowerbiserviceprincipal to the workspace tomsworkspace:
.
Note, the DevOps service principal serviceprincipal-tomsazuredevopsproject would need to be a member for both the workspace and the security group if we were to use the service principal for publishing the semantic model. However, in the scenario of this blog post this is not needed, because we only want to take over the semantic model.
h. Read access rights for the service principal in the data source:
.
i. A key vault toms-key-vault with the secrets clientid-service-principal and secret-service-principal:

.
g. An access policy in the key vault that allows the service principal serviceprincipal-tomsazuredevopsproject to get and list secrets:
.
2. The powershell script
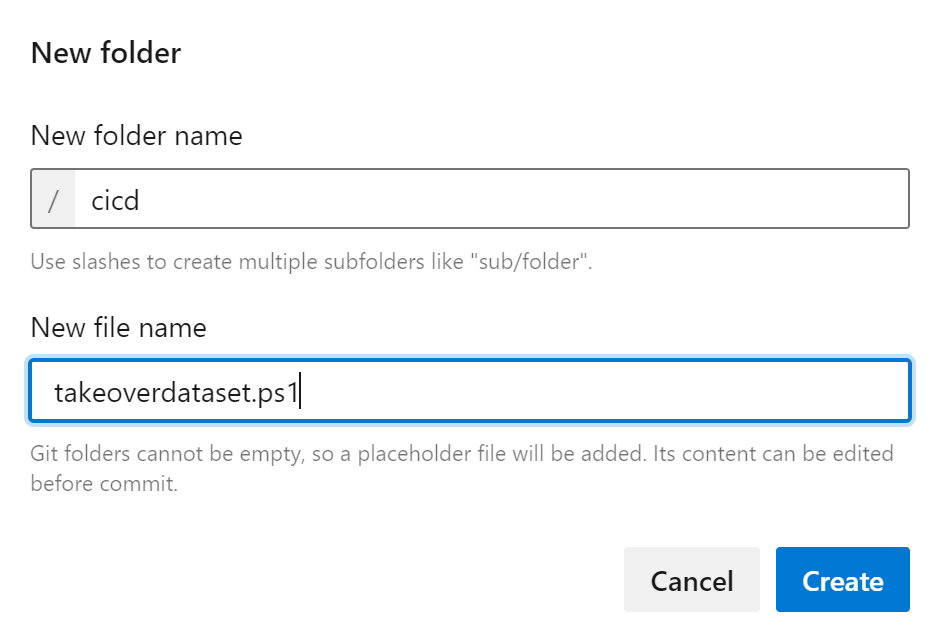
In the repository, let’s create a folder called cicd with an empty PowerShell script called takeoverdataset.ps1:
.
Here the PowerShell script:
param
(
    [parameter(Mandatory = $true)] [String] $sptenantid,
    [parameter(Mandatory = $true)] [String] $spclientid,
    [parameter(Mandatory = $true)] [String] $spsecret,
    [parameter(Mandatory = $true)] [String] $pbidatasetname,
    [parameter(Mandatory = $true)] [String] $pbiworkspacename
)

Write-Host "build up credentials of service principal"
$spsecretsecurestring = ConvertTo-SecureString $spsecret -AsPlainText -Force
$spcredentials = New-Object -TypeName PSCredential -ArgumentList $spclientid, $spsecretsecurestring
Write-Host "install power bi module profile & workspaces"
Install-Module -Name MicrosoftPowerBIMgmt.Profile    -Verbose -Scope CurrentUser -Force
Install-Module -Name MicrosoftPowerBIMgmt.Workspaces -Verbose -Scope CurrentUser -Force
Write-Host "login to power bi with service principal"
Connect-PowerBIServiceAccount -ServicePrincipal -Credential $spcredentials -Environment Public -Tenant $sptenantid
Write-Host "get power bi workspace"
$workspace = Get-PowerBIWorkspace -Name $pbiworkspacename
Write-Host "get datasets from workspace"
$datasets = Invoke-PowerBIRestMethod -Url "groups/$($workspace.id)/datasets" -Method Get | ConvertFrom-Json
Write-Host "get datasetid from datasets"
foreach ( $dataset in $datasets.value )
{
    if ( $dataset.name -eq $pbidatasetname)
    {
        $datasetid = $dataset.id
        break;
    }
}
Write-Host "take over dataset"
Invoke-PowerBIRestMethod -Url "groups/$($workspace.id)/datasets/$($datasetid)/Default.TakeOver" -Method POST | ConvertFrom-Json
Write-Host "took over dataset successfully"
Write-Host "get accesstoken"
$accesstoken = Invoke-RestMethod -Uri "https://login.microsoftonline.com/$($sptenantid)/oauth2/token" -Body "grant_type=client_credentials&client_id=$($spclientid)&client_secret=$($spsecret)&resource=https://database.windows.net/" -ContentType "application/x-www-form-urlencoded" -Method POST
Write-Host "get gateway"
$gateway = Invoke-PowerBIRestMethod -Url "groups/$($workspace.id)/datasets/$($datasetid)/Default.GetBoundGatewayDataSources" -Method GET | ConvertFrom-Json
Write-Host " build body for credential update"
$body =
'{
    "credentialDetails" : {
        "credentialType" : "OAuth2",
        "credentials" : "{\"credentialData\":[{\"name\":\"accessToken\", \"value\":\"' + $accesstoken.access_token + '\"}]}",
        "encryptedConnection" : "Encrypted",
        "encryptionAlgorithm" : "None",
        "privacyLevel" : "None"
    }
}' | ConvertFrom-Json
Write-Host "update credentials"
Invoke-PowerBIRestMethod -Url "https://api.powerbi.com/v1.0/myorg/gateways/$($gateway.value.gatewayid)/datasources/$($gateway.value.id)" -Body ($body | ConvertTo-Json -Depth 80) -Method PATCH
Write-Host "updated credentials successfully"
.
A few comments on the script:
– the script is intended to be part of a release pipeline that deploys one semantic model at a time. Feel free to adjust the script, if you’d like to use it to take over several semantic models in one go
– the refresh won’t work just by taking over the semantic model. Instead, we need to retrieve an access token for the azure sql database and pass it on to Power BI (see line 43 an onwards)
.
3. Create the release pipeline
Note, this blog post does not focus on how to deploy and publish Power BI semantic models from Azure DevOps. You would normally incorporate the bits from below in to your existing release pipeline. Still, in this blog post, we create a new pipeline from scratch:
.
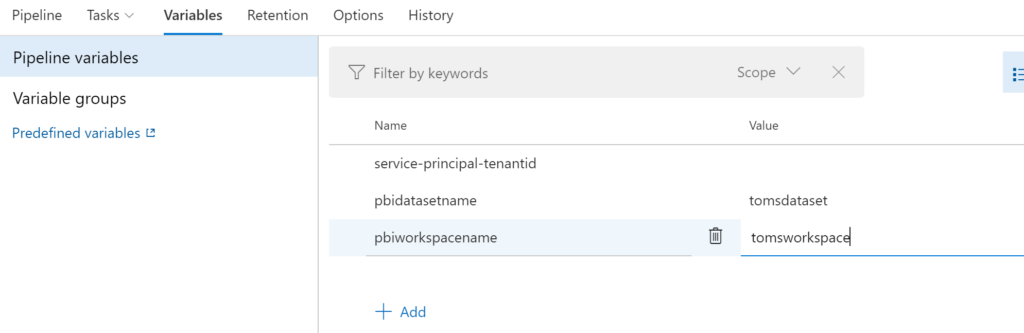
Specify the following variables for the pipeline. The tenantid you can find under tenant properties in the Azure portal:
.
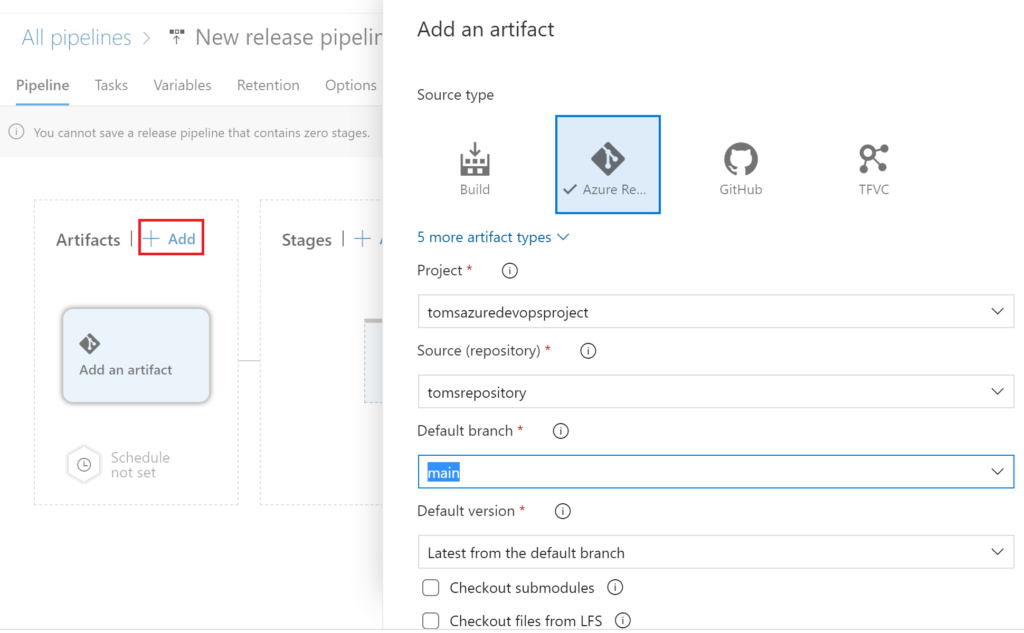
Add a new artifact to the pipeline. The artifact shall reference the main branch of the repository. We will utilize this artifact to refer to the PowerShell script.
.
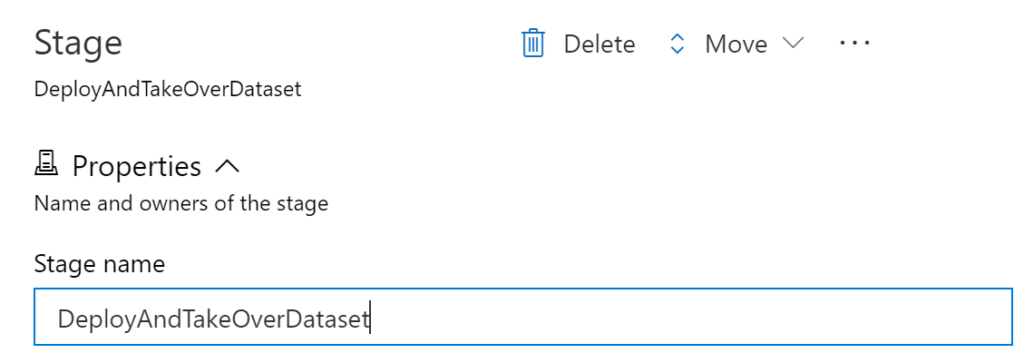
Then, add a new stage with an empty job and name it reasonably:

.
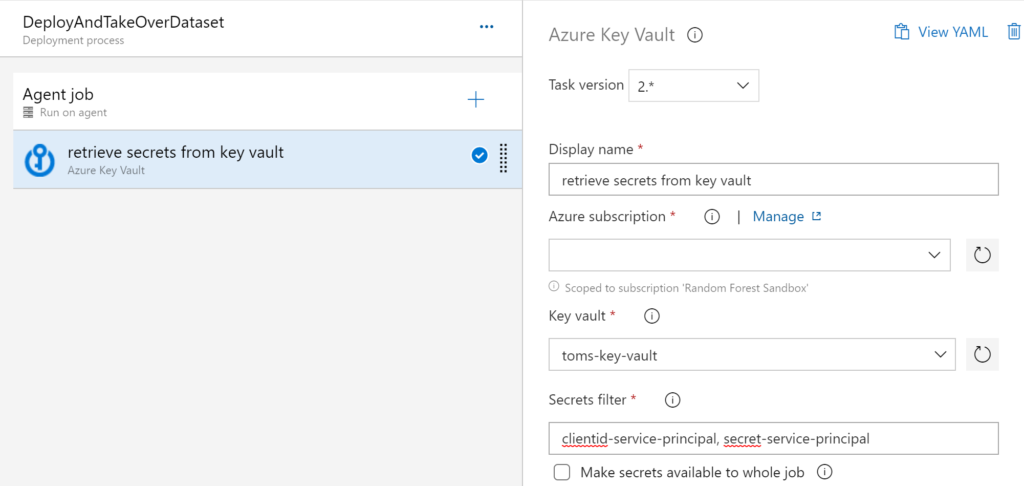
Next, we add an Azure Key Vault task to our pipeline from which we retrieve the clientid and secret of the service principal that shall take over the semantic model:
– Display name: retrieve secrets from key vault
– Key vault: toms-key-vault
– Secrets filter: clientid-service-principal, secret-service-principal
.
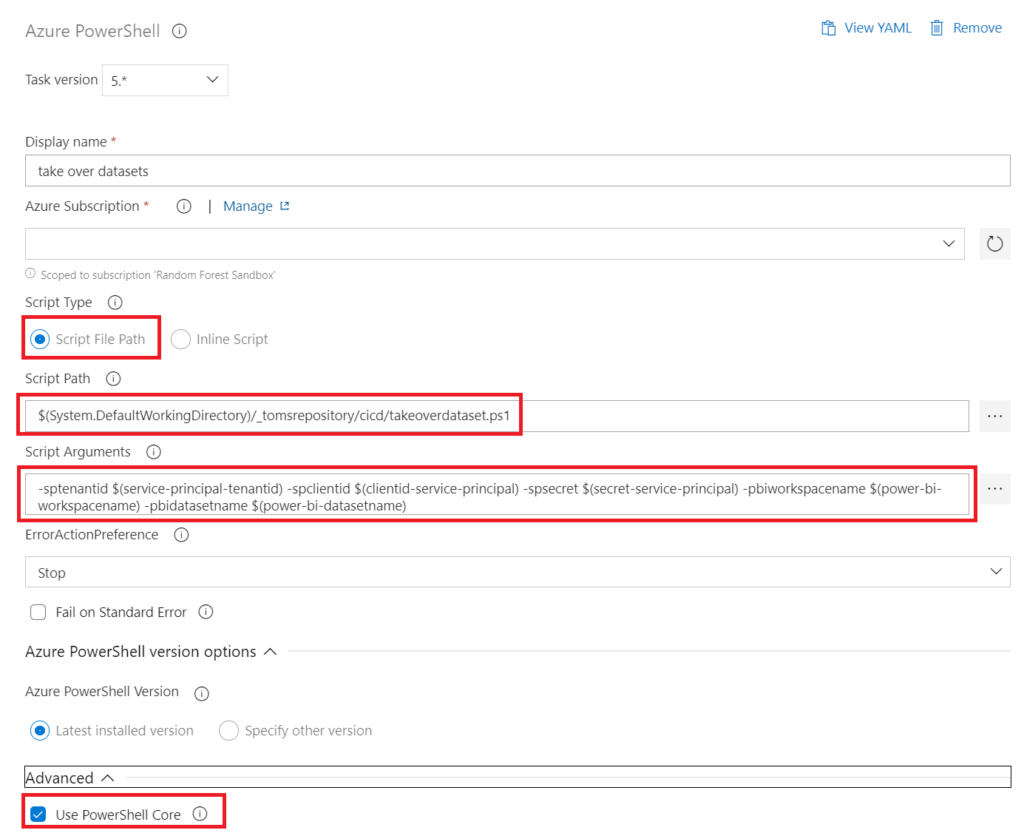
Finally, we need an Azure PowerShell task referencing our PowerShell script in the repository with the following properties: Note, PowerShell core must be checked.
– Display name: take over datasets
– Script Path: $(System.DefaultWorkingDirectory)/_tomsrepository/cicd/takeoverdataset.ps1
– Script Arguments: -sptenantid $(service-principal-tenantid) -spclientid $(clientid-service-principal) -spsecret $(secret-service-principal) -pbiworkspacename $(power-bi-workspacename) -pbidatasetname $(power-bi-datasetname)
.
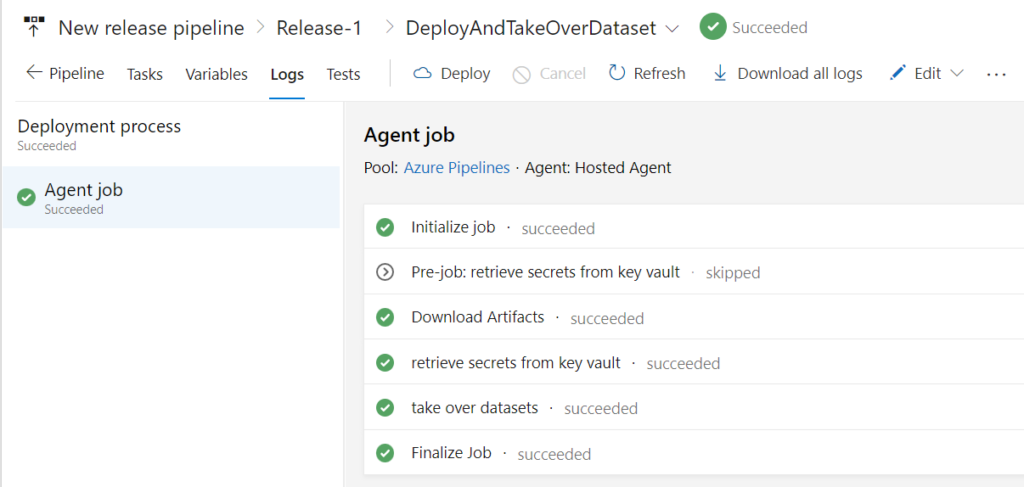
4. Showtime!
Let’s run the pipeline and see what happens!
.
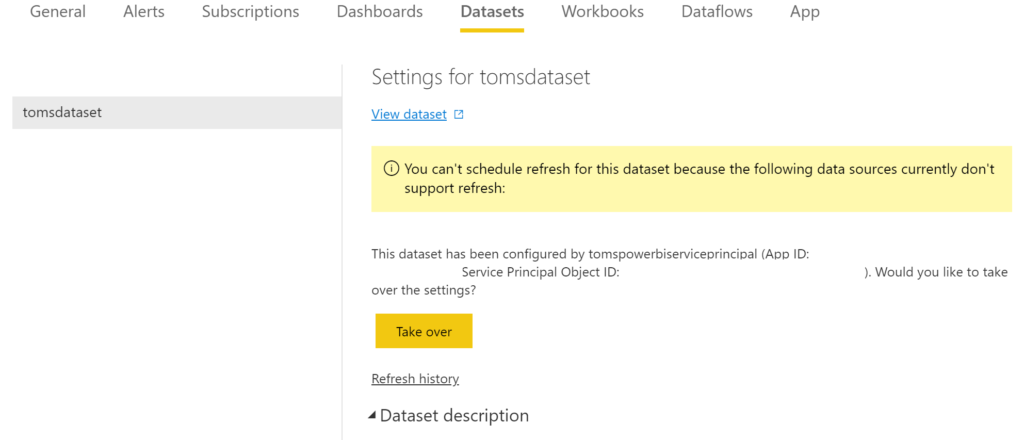
In Power BI, we can see that the service principal has successfully taken over the semantic model:
.
When triggering a semantic model refresh straight after we ran the Azure DevOps pipeline, the refresh succeeds as well:

.
end.
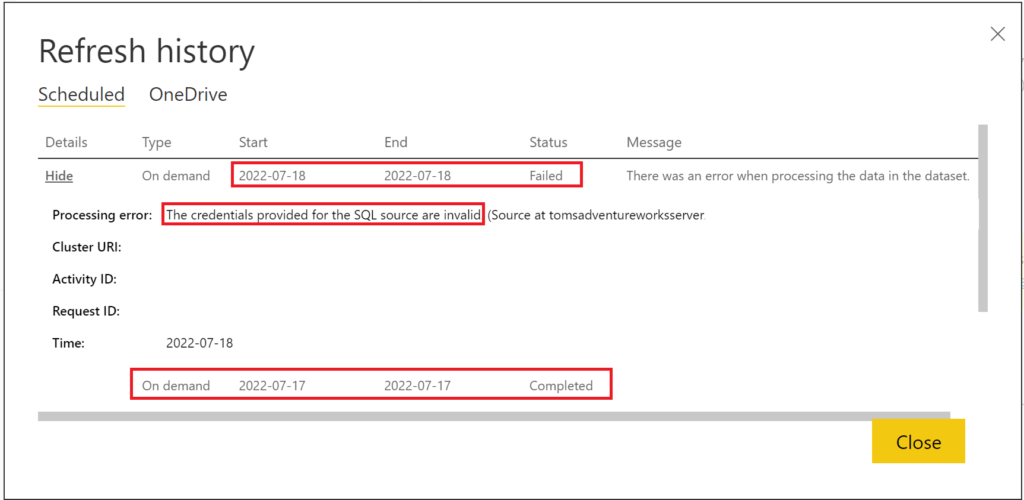
Obviously, the token expiration issue is not solved with this approach only. In fact, already a day after the service principal has taken over the semantic model, the refresh fails:
.
The good thing is that we can use the service principal to refresh the token programmatically as seen in the second part of the PowerShell script. Note, for getting a token for your data source, you also need to use the correct Resource URL. You may want to check out this blog post here if you have trouble finding the correct one.
In the next blog post, I will provide a walk-through on how to refresh the token right before the semantic model refresh is triggered from Azure Data Factory. Further information on this service account topic, can be found in this video by Adam from guy in a cube.
Great blog article and a huge help. Thank you so much!
Hi Raphael! Thanks for your kind words! Always happy to help :)
Your blog helped me a lot. Thank you!
Hiya! :)
Always glad to help!
/Tom
Hi, thanks for articles like this. Unfortunately installation of MicrosoftPowerBIMgmt modules may take up to 5min per every agent so I may recommend another faster solution using pure API without MS cmdlets:
You can get tokens using azure related tasks for example AzurePowerShell:
– task: AzurePowerShell@5
displayName: get access token
inputs:
azureSubscription: ‘YOUR NAME HERE’
scriptType: ‘InlineScript’
inline: |
Import-Module Az.Accounts -MinimumVersion 2.2.0
$token = (Get-AzAccessToken -ResourceUrl https://analysis.windows.net/powerbi/api.Token)
Write-Output(“##vso[task.setvariable variable=accessToken;]$token”)
$tokenSQL = (Get-AzAccessToken -ResourceUrl https://database.windows.net/.Token)
Write-Output(“##vso[task.setvariable variable=accessTokenSQL;]$tokenSQL”)
azurePowerShellVersion: latestVersion
pwsh: true
then in PowerShell we have such function:
function UpdateDatasource ($accessToken, $accessTokenOAuth2,$gatewayId, $datasourceId){
$uri = “https://api.powerbi.com/v1.0/myorg/gateways/${gatewayId}/datasources/${datasourceId}”
$header = @{
“Authorization” = “Bearer ${accessToken}”
“Content-Type” = “application/json”
}
$body =
‘{
“credentialDetails” : {
“credentialType” : “OAuth2”,
“credentials” : “{\”credentialData\”:[{\”name\”:\”accessToken\”, \”value\”:\”‘ + $accessTokenOAuth2 + ‘\”}]}”,
“encryptedConnection” : “Encrypted”,
“encryptionAlgorithm” : “None”,
“privacyLevel” : “None”
}
}’ | ConvertFrom-Json
Write-Output “Updating datasource ‘$datasourceId’ in gateway ‘$gatewayId'”
$result = Invoke-RestMethod -Uri $uri -Method “PATCH” -Body ($body | ConvertTo-Json -Depth 80) -Headers $header
return $result
}
finally the execution will looks like this:
[…] (here code to get workspace/dataset/gateway similar as above)
foreach ($row in $gateway)
{
if ([string]::IsNullOrEmpty($row.datasourceId)){}
else
{
Write-Output “Database used: ”
Write-Output $row.connectionDetails.database
UpdateDatasource -accessToken $accessToken -accessTokenOAuth2 $accessTokenSQL -gatewayId $row.gatewayId -datasourceId $row.datasourceId
}
}
Hi Michal!
This is a very good point! Thank you for sharing!
In fact, when I implemented this last time, we actually hosted the Azure DevOps pipelines ourselves, so we just installed the modules once. Yet, you absolutely have a good point here and I am glad you shared your script!
I’ll definitely try it out next time I set this up.
Once again, thank you!
/Tom
I am not against using the API calls, but to get around the slow module import I used ModuleFast https://github.com/JustinGrote/ModuleFast which takes less than 10 seconds, just putting the following in my script: ” & ([scriptblock]::Create((Invoke-WebRequest ‘bit.ly/modulefast’))) -Specification MicrosoftPowerBIMgmt “
Thanks for sharing!